Welcome

My name is Lisa and I'm a crafty girl with wanderlust working as an engineer by day. My blog chronicles projects in my home as well as pictures and stories from my travels.

Search


Instagram

Blog Index
The journal that this archive was targeting has been deleted. Please update your configuration.
Navigation
Friday
Jun012012

Resolution Recap: May 2012

Last month my 2012 New Year's resolutions of purging and organizing my home and finishing up projects around the house went by the wayside a bit but I was back on track in May. I am happy with what I accomplished, especially the garage cleaning.

Resolution 1: Purge & Organize
I met my goal of having a volume of at least one trash cart (between my recycling and regular trash) out on the curb on garbage pick-up morning every Monday in May, even on the Monday following my weekend trip to Florida. Here's my breakdown:

- May 7: 3/4 full trash + 1/2 full recycle = 1-1/4 total
- May 14: 3/4 full trash + 1/4 full recycle = 1 total
- May 21: 1 full trash + 1 full recycle + 3 SUV loads full (from garage cleaning) = tons!
- May 28: 1 full trash + 1/4 full recycle = 1-1/4 total

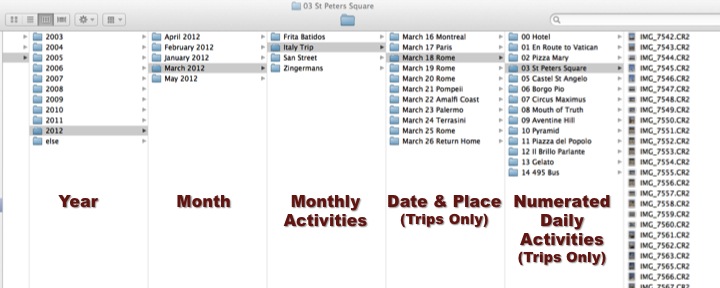
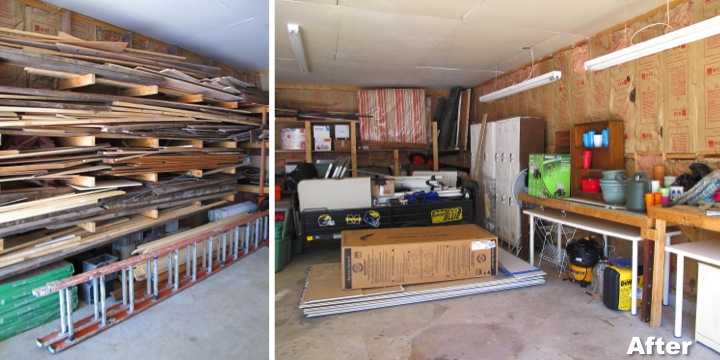
On the organizing front Frank helped me clean and organize my garage. It definitely needs more work, but it is so nice to have space in there to work on projects now. I also did some blog organizing creating my Projects tab with thumbnails of projects as well as my Away tab with a clickable map of where I have traveled.

Resolution 2: Finish Up Projects
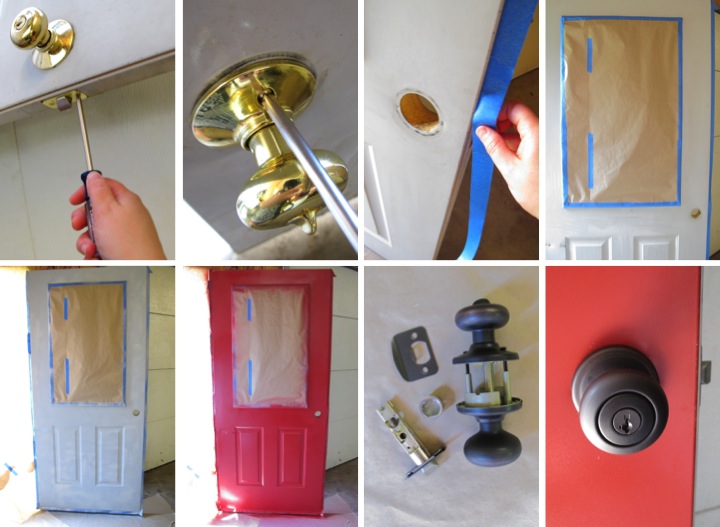
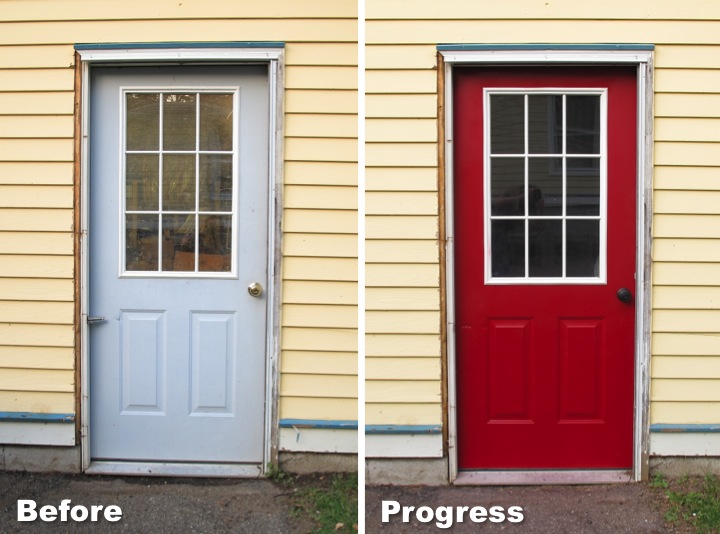
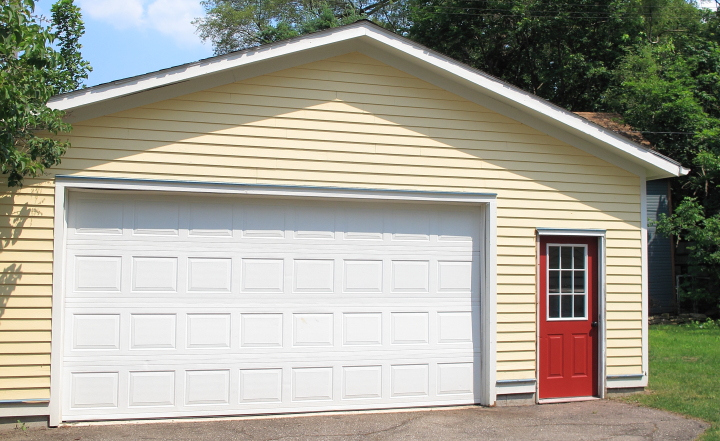
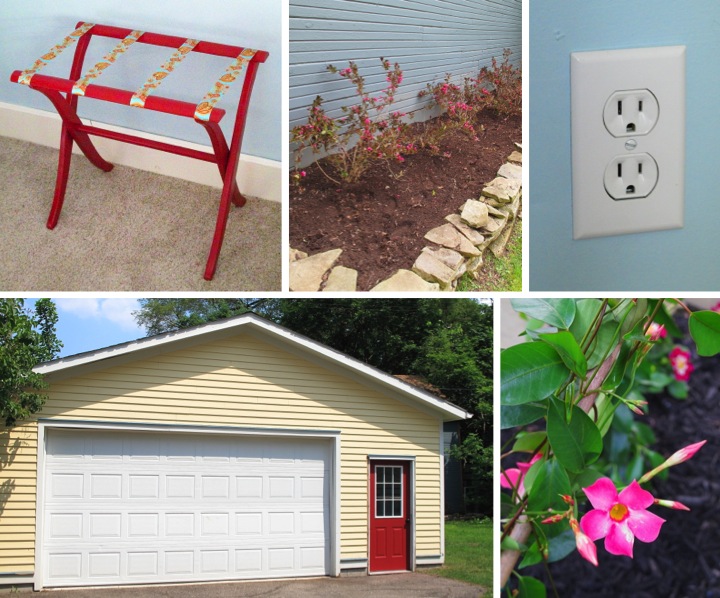
I got a lot of gardening work done outside in May including new plantings in my front beds and clearing out my back bed. In my guest room I got a little more done, replacing the old outlets and making over a luggage stand that I rediscovered during my garage cleaning. I also spruced up my garage door by painting it red and replacing the door knob and worked on my application to the historic district for new shutters and two replacement windows

In June I hope to fix the trim on the garage door and maybe get some things done in my back entry/laundry room.

How are you coming along on your New Years Resolutions? Did you finish up any big projects in May? 

Friday
Jun012012

Picture of the Day: View From Cape Byron Lighthouse

Byron Bay, New South Wales, Australia
3.09.2009 

Thursday
May312012

Digital Photo Storage Organization

Back when I used a film camera I used to organize my photos in chronological order in photos boxes and kept my negatives in binders. When I switched over to digital back in 2003 I had to find a good way to sort and deal with all of the digital photo files I now had.

My system has evolved a bit over time, but here it is in a nutshell. On my hard drive I have a folder for every year. Under every year I have a folder for every month and then every activity within that month. I then put my pictures within that activity folder. For the example below I went to Zingermans for dinner in March so those photos are in 2012/March 2012/Zingermans.

That system works well for basic things that happen in a month, but it is insufficient for the photos I take on a trip. On a vacation it is not uncommon for me to snap over a hundred photos in a day and when you multiply that by a week or two it ends up being a lot of photos. To organize trip photos I make a trip folder under the month that the trip occurred and then make sub-folders for each day of the trip with the place that I was on that day. For each day I then make another set of folders about the specific activities/places I saw on that day and then number the folders in order of when I did them on that day. So for the example below, the third thing that I did on March 18 in Rome on my Italy trip was visit St. Peter's Square so those pictures are in 2012/March 2012/Italy Trip/March 18 Rome/03 St Peters Square. Having the sub-folders for each activity on a day is great so that I don't have to try and remember a few years later where a particular photo was taken.

The two exceptions that I have to this system are that I keep the pictures that I take of blog projects in a separate area (but similarly structured) and I keep pictures of my house in folders sorted by room. Overall, I have used my system for a while and it works really well for me to be able to quickly find any photo I am looking for.

How do you organize your digital photo files? What system do you use to easily find photos?

Thursday
May312012

Picture of the Day: Tourists at the Base of Niagara Falls

Niagara Falls, Ontario, Canada
5.18.2009

Wednesday
May302012

Treasures From My Travels: Nisshin Flour Milling Sign

I love bringing home things from my travels to decorate my home and each souvenir is special, but my Nisshin Flour Milling sign has a particularly dear spot in my heart.

I bought the sign at the wonderful To-ji Flea Market. To-ji is a beautiful Buddhist temple in Kyoto and on the first Sunday of every month there is an antiques oriented flea market on the grounds. After my friend, Trisha, and I had our debacle of visiting the market with no access to our money (the ATMs were closed) we went back two months later.  

On that second trip to To-ji Flea Market I found my vintage metal Nisshin Flour Milling sign. My kitchen in the US was red and green so as soon as I saw it I knew it would be perfect to hang there when I moved back. I also love to bake so being a flour milling sign gave it extra meaning. I love the worn patina it has with some small rust spots dotting the cream background and green border.

I did a bit of haggling and got the sign for ¥2000 (about $20 at the time) and happily lugged it home. I was not allowed to put holes in the walls of my Japanese apartment and the metal sign was too heavy for Command Strips so I propped it on top of my dry goods storage shelf.

When I moved back to the US I didn't want to pack the sign in my sea shipment (just in case it got lost and also because I didn't want to wait two months for it to arrive) so I put it in the bottom of one of my checked bags on my flight home. It was so heavy to lug that bag around but so worth it. My Nisshin Flour Milling sign was the very first thing I hung on my walls when I moved back into my house. When I was struggling with readjusting to life back in the US, seeing it in my kitchen gave me a sense of continuity and brought back good memories of Japan.


Of course I had to do a little digging into the history of the sign. The first line of Japanese Kanji reads 日清製粉株式會社  and means (yes, you guessed it!) Nisshin (日清) Flour Milling (製粉) Company Limited (株式會社) and the bottom three characters mean Distributor (特約店) so the Japanese didn't really give me any additional information. I did some internet searching and found that the company was founded in 1900 as Tatebayashi Four Milling Company. Later in 1908 when Tatebayashi merged with Nisshin Flour Milling Company, the company incorporated under the Nisshin Flour Milling Company name. The company is still in existence today and Nisshin Flour Milling Inc. is one of the subsidiaries of the holding company, Nisshin Seifun Group Inc. Isn't it amazing what you can dig up online?

It has been nearly four years since I bought my Nisshin Flour Milling sign and it is as special as ever to me. It has graced my kitchen wall on two continents and traveled in my suitcase with me. It also represents different sides of me, loving to travel (Japan) and loving to do things at home (flour) and will always be a treasure to me.   

Linked To: Centsational Girl's Favorite Souvenirs Link Party

Wednesday
May302012

Picture of the Day: North Temple Pagoda in Suzhou


Suzhou, China
2.2009

Tuesday
May292012

Painting My Garage Door Red

Earlier this year a strong gust of wind during a storm caught the screen door on my garage and yanked it off along with a piece of the door trim. Since the screen door was mostly a hassle I decided that I am not going to put it back on and instead just spruce up the door and frame without it.

To start I thought that painting the door red would really make a nice improvement. It was a pale grey color which was very blah and always looked a bit dingy. I began by cleaning the door and removing the old door knob by taking out the screws from the latch and inside knob. I then taped around the perimeter of the door to mask it and put paper along the floor and garage wall. I also taped around the window and covered the glass with paper.

Once everything was prepped I primed the door with grey spray paint primer and then applied a few coats of red spray paint. Once everything was dried I installed a new door set with an oil rubbed bronze finish. 

I love the new door color. I think it looks great with the yellow, teal and white color scheme and really brightens up the garage. The formerly boring door now looks fun and inviting.

I still need to replace the trim around the door and do some paint touch-ups but painting the door was definitely a step in the right direction.

What do you think of the new door color? Do you have a fun color on your garage door or one of your house doors?

Tuesday
May292012

Giveaway Ending Tomorrow

My six month celebration giveaway is ending tomorrow so if you want to enter, please comment on the original giveaway post. Also, if you liked me on Facebook, started following me on Pinterest or pinned some of my posts for extra entries make sure that you comment that you did so on the original giveaway post so I can count it.

I also want to say thank you so much for all of the sweet comments everyone has posted about my pictures. It really means a lot to me. Thank you!

Tuesday
May292012

Picture of the Day: Lioness in Kruger National Park

Kruger National Park, South Africa
7.28.2004

Monday
May282012

A Blank Slate For My Back Garden Bed

My back garden bed has been sadly neglected for a long time. Two years ago I bought some wine and roses weigela plants that were on clearance and planted them in the back bed. They were on clearance because they were in bad shape and I didn't do much to help nurture them so they have become scraggly and one even died.

Last summer I was so busy that I just let the bed go and I am definitely paying the price for it now. This spring the bed looked like a jungle and it was a ton of work to get it all cleaned out. To make the work a little easier on myself I cleared the bed in a few different shifts after it had rained. I like to weed when the ground is wet since it makes it easier to pull them.

After the bed was cleared I loosely tied up the weigela with some twine, spread some peat moss with fertilizer on the bed and then rototilled around the weigela. I had a minor mishap when a stone got caught in my blade. It was really jammed in there so I ended up having to use a hammer to knock it out.

With the bed cleared and the ground turned I now have a blank slate in my back garden bed to finally get to some fun. I am planning to plant my sunflowers and zinnias that I started under my grow lamp back there. I also need to do some trimming and care on the weigela plants that have been so neglected. I have a long way to go before it starts to look pretty back there but at least I am on my way.

Have you ever neglected part of your garden and then regretted it later? Do you have any overgrown areas that you needed to clear this year?