Picture of the Day: Capuchin Monkey Eating A Mango
Gatun Lake, Panama
6.12.2012
 Tuesday, July 10, 2012 at 5:52AM | Posted by
  Lisa |
  Post a Comment | |
  Email Article |
  Print Article
 My name is Lisa and I'm a crafty girl with wanderlust working as an engineer by day. My blog chronicles projects in my home as well as pictures and stories from my travels.
Gatun Lake, Panama
6.12.2012
 Tuesday, July 10, 2012 at 5:52AM | Posted by
  Lisa |
  Post a Comment |
  Share Article |
  Email Article |
  Print Article
 Frank just got a smoker this past weekend and decided to break it in by making pulled pork yesterday. I luckily got to be the beneficiary of the tasty food and also documented everything in pictures.

The night before Frank applied a dry rub on two pork butts and then let them marinate in the refrigerator overnight.
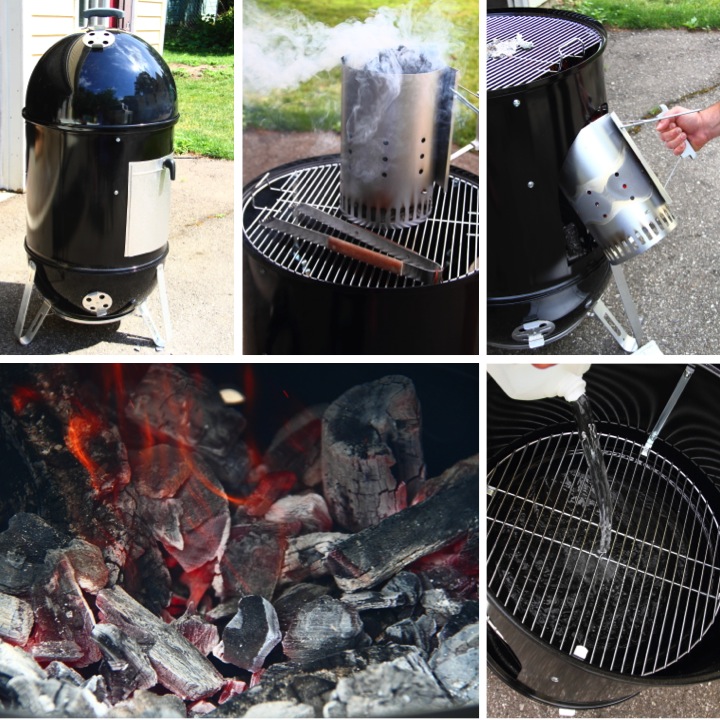
Yesterday morning Frank started by setting up the smoker and placing a layer of hardwood lump charcoal along the bottom of the smoker. He then filled a chimney with paper in the bottom and hardwood lump charcoal in the top.
After lighting the paper he waited until the fire burnt down and then poured the hot charcoal from the chimney onto the bottom of the smoker. Frank then filled up the water pan placed inside of the smoker.
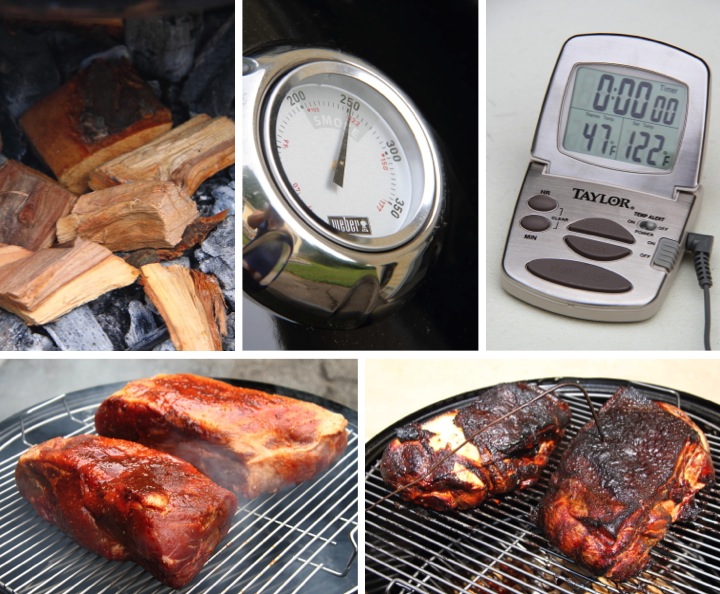
Frank added some apple wood on top of the charcoal, closed up the smoker and then waited until it heated up to 250 degrees. Frank placed the pork butts on the top rack of the smoker, put the probe of a digital thermometer in the center of one of the cuts of meat and then placed the lid on top of the smoker. After a few hours the meat had a wonderful crust on it.
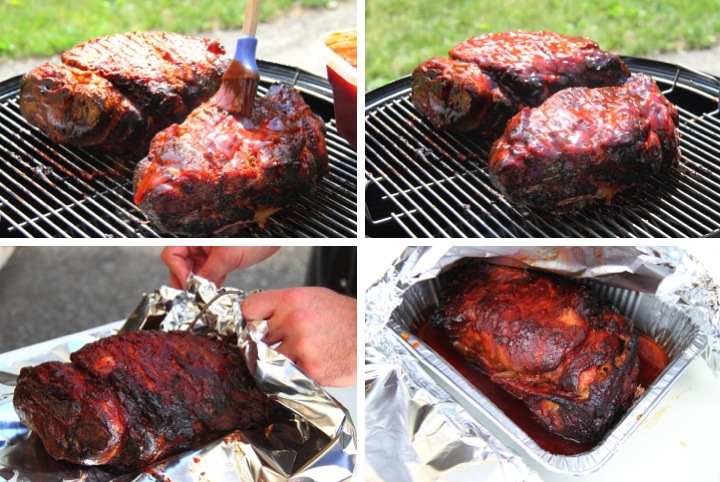
Frank flipped the pork butts, basted the top of them and then placed the lid back on the smoker to let it cook some more. He then placed them in foil tents before putting them back in the smoker for a final time. Once the pork butts reached an internal temperature of 190 degrees, Frank took them out, placed them in covered metal pans and poured a pre-finishing sauce over them to soak up while the meat rested.
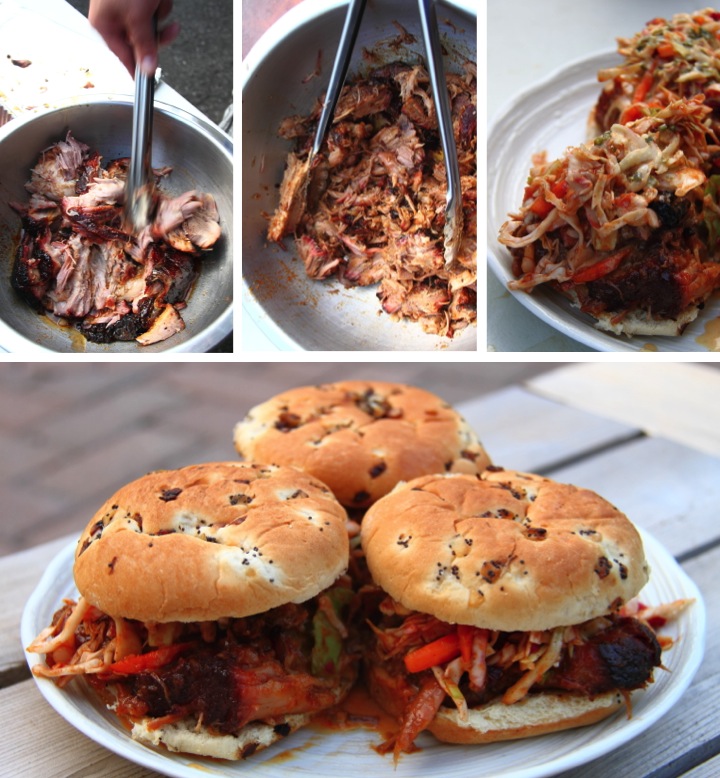
After the meat rested, Frank shredded the pork with tongs and then added his finishing sauce to the meat. He toasted some buns on the smoker and then started assembling the sandwiches. He put a generous layer of pulled pork on the bun topped by a deliciously spicy coleslaw than he made.
Having gone to undergrad in North Carolina I absolutely love pulled pork and was really excited about Frank making these amazing sandwiches. They turned out fabulously and I hope he makes them again soon.
Have you been doing any grilling or smoking this summer? What have you been making?
Linked To: Centsational Girl's BBQ Link Party
 Monday, July 9, 2012 at 7:57AM | Posted by
  Lisa |
  3 Comments |
  Share Article |
  Email Article |
  Print Article
Positano, Italy
3.22.2012
 Monday, July 9, 2012 at 6:03AM | Posted by
  Lisa |
  1 Comment |
  Share Article |
  Email Article |
  Print Article
 Now that I've done a few little things to spruce up my front porch, like make a self-watering planter, spray paint my table teal and lay out a new rug, I thought it was time to decorate a little.
I wanted to add a few cute things, but because it is outside I didn't want to add anything valuable in case they got ruined. 
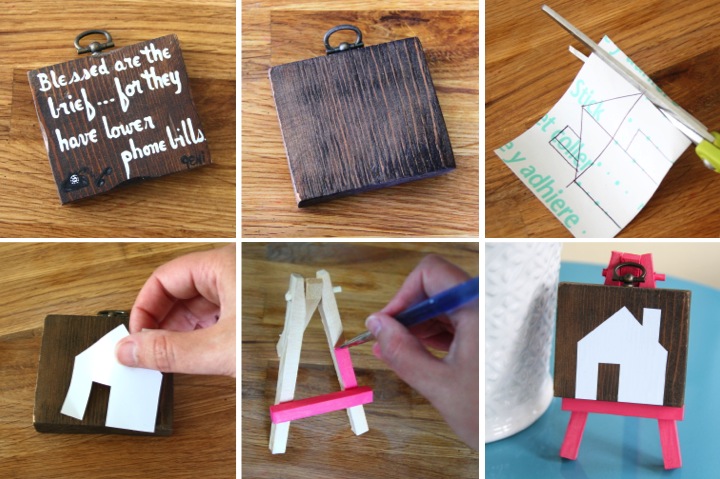
My first addition was inspired while I was perusing the Ann Arbor ReUse Center. I found a tiny wooden plaque that someone had hand painted with the message "Blessed are the brief...for they have fewer phone bills." At first glance it was pretty tacky, but when I flipped it over the backside was a nice already stained plaque in good shape. It was only $0.50 so I was sold.
Once I got home I decided that I wanted to add a little house silhouette on the front of the plaque. I had some extra vinyl left over from when I made my templates for etching my Limoncello bottles so I used that. I sketched out a house outline on the back of the vinyl, cut it out and adhered it to the plaque.
I needed something for the plaque to stand on and a tiny wood easel that I bought for a dollar from Jo-Ann Fabrics did the trick. I wanted to add a little color so I painted it coral pink with some craft paint. Once the paint was dried I set up the easel on my front porch table and placed the little plaque on it.
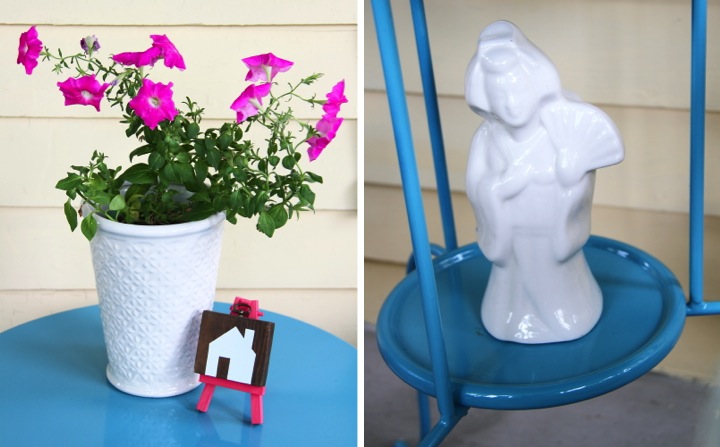
With my little home plaque joining my self watering petunia plant on the top of the table, I turned to finding something to go on the lower shelf of the table. Rummaging through some old things I came across this white ceramic geisha drink glass and thought it would be perfect. When I turned twenty-one I celebrated by going out to Benihana (yeah, I am a wild one!) for dinner and my very first legal alcoholic drink was a fruity mixed drink in that glass. Over the intervening years I've held onto it but it really hasn't done much other than collect dust. It was just the right size and proportion to fit on the shelf so outside it went.
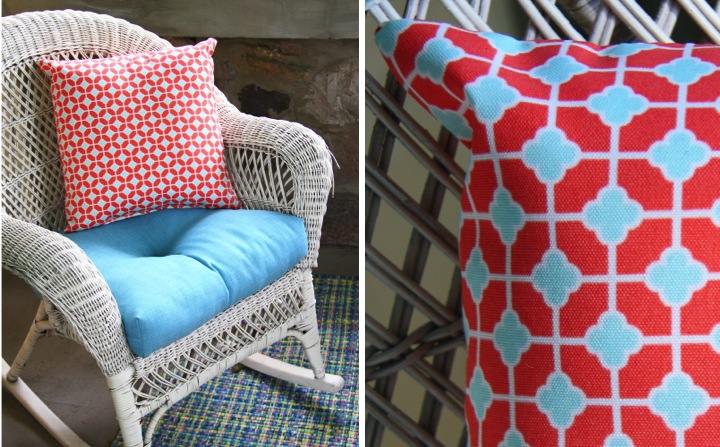
While I was at Home Depot picking up some paint I stumbled across these coral pink and light blue outdoor pillows on sale for $11. The pattern picks up the colors in my scheme and looks bright and cheery. They are also very soft and comfy which will make relaxing on the front porch even better.
I'm pretty happy with how everything has come together and while I am sure that I will probably do some tweaking later, I think it is basically finished...for now.
Are you enjoying your front porch this summer? Is it someplace that you enjoy hanging out? Have you done anything to decorate it?
 Sunday, July 8, 2012 at 6:59PM | Posted by
  Lisa |
  3 Comments |
  Share Article |
  Email Article |
  Print Article
Sydney, New South Wales, Australia
11.2010
 Sunday, July 8, 2012 at 6:04AM | Posted by
  Lisa |
  Post a Comment |
  Share Article |
  Email Article |
  Print Article
 This past week was Frank's birthday so I thought that I would share the cake I made for him last year.
I made a chocolate cake using the recipe for Beatty's Chocolate Cake and then made a chocolate ganache filling between the layers. To cover the cake I made rolled buttercream icing in chocolate and vanilla. I rolled out the vanilla, cut a strip of it and placed it across the middle of the cake. I then did the same for the chocolate and used it to cover the top and bottom. 
With a base of icing on the cake I set about decorating it. Using icing that I tinted black, I piped five parallel lines across the cake to make a music staff. I looked up the sheet music for the happy birthday song online and then piped the notes for the song onto the music staff, writing the words "Happy B-Day Dear Frank" under the corresponding notes.
To finish off the cake I added a little color by tinting some icing blue and using it to add a border above and below the music and then piped blue stars along the base.
Trying to use rolled buttercream to cover the cake instead of fondant was quite a challenge, and it wasn't as smooth as fondant, but it tasted really wonderful. The rolled buttercream is so soft that it really wasn't feasible to deal with very large sections and the only way I was able to manage it was doing in the three sections that I did. The taste made it worthwhile though, and it is definitely something that I'll have to try again.
 Saturday, July 7, 2012 at 12:01PM | Posted by
  Lisa |
  5 Comments |
  Share Article |
  Email Article |
  Print Article
Antigua Guatemala, Guatemala
7.03.2009
 Saturday, July 7, 2012 at 6:03AM | Posted by
  Lisa |
  2 Comments |
  Share Article |
  Email Article |
  Print Article
 Chicago, Illinois, United States
5.28.2011
 Friday, July 6, 2012 at 6:05AM | Posted by
  Lisa |
  1 Comment |
  Share Article |
  Email Article |
  Print Article
 Frank and I are headed to his friend's family cottage for a few days on the lake so I wanted to bring a fun treat with me to share. Everyone loves cupcakes so I decided to make some chocolate mini-sized ones with buttercream icing.

I didn't have a lot of time to make them, but wanted them to be cute. Things taste better if they are cute, wouldn't you agree?
I had some blue mini cupcake liners on hand plus some leftover blueberries from the pie I made yesterday that did the trick.
I baked the cupcakes in the blue mini liners and then made the frosting while they cooled. Using a large start tip I piped the icing on each cupcake and topped it with a juicy blueberry. The cupcakes were quick, easy and delicious: just how I like things!
 Thursday, July 5, 2012 at 10:29AM | Posted by
  Lisa |
  3 Comments |
  Share Article |
  Email Article |
  Print Article
 I love cake. Not only is cake tasty delicious by itself, but it is a wonderful vehicle for one of my favorite things: frosting. I'm particularly partial to buttercream icing. It's whipped up butter and sugar with a little flavoring. What could possibly be better than that?

This recipe is based off of the Wilton buttercream icing recipe that my grandmother taught me to use when I first started decorating cakes. The Wilton recipe calls for a using mixture of half shortening and half butter, but I prefer to use all butter for my frosting. It makes the icing a little more cream colored, but I am all for sacrificing a little prettiness in the name of taste.
I love homemade buttercream icing because it is nice and sweet without having the sickeningly sweet taste that store bought frosting can have. It is also super simple and easy to whip up a batch and it keeps well in the fridge. To use it after you have refrigerated it, just let it warm up a bit and then whip it up again by hand or with a mixer. I always have bags of powdered sugar and sticks of butter on hand because you never know when you may need some icing.
Ingredients List
- 1 cup butter
- 1 tsp. vanilla extract
- 1 tsp. almond extract
- 4 cups powdered sugar (about 1 lb.)
- 2 Tbsp. milk
Directions
- Cream butter in mixer with vanilla and almond extract
- Mix in powdered sugar one cup at a time
- Stir in milk to achieve desired consistency
Tips and Tricks
- I use butter so this recipe has a slight cream color instead of a true white. I don't mind because I prefer the taste, but if you want a true white icing you can substitute Crisco and butter flavoring
- To thin icing for spreading on a cake add 3-4 extra tablespoons of milk
 Thursday, July 5, 2012 at 10:05AM | Posted by
  Lisa |
  6 Comments |
  Share Article |
  Email Article |
  Print Article