Picture of the Day: CN Tower Illuminated for Christmas
Toronto, Canada
12.19.2012
 Monday, December 24, 2012 at 7:04AM | Posted by
  Lisa |
  Post a Comment | |
  Email Article |
  Print Article
 My name is Lisa and I'm a crafty girl with wanderlust working as an engineer by day. My blog chronicles projects in my home as well as pictures and stories from my travels.
Toronto, Canada
12.19.2012
 Monday, December 24, 2012 at 7:04AM | Posted by
  Lisa |
  Post a Comment |
  Share Article |
  Email Article |
  Print Article
 Frank and I arrived back from our short trip to Toronto last night. Due to me not feeling well and being out of town a lot I didn't do much decorating in my home this year for the holidays but I thought I would share a few pictures of the decorations in Toronto that inspired me.
The first thing that you notice wandering around town is the way that all of the outdoor planters are done up for the holidays. The basic theme was to have tall birch logs in the center of the planter for height with an arrangement of greens around the base. I saw tons of variations on this with curly willow, magnolia leaves, seed pods, pinecones and ornaments included in the mix. They were all really pretty and looked quite festive.
My favorite variation that I saw was swapping out the birch logs for bamboo painted a bright, cheery red color. It was so striking to look at.
Moving indoors, I thought that this line-up of Christmas trees each decorated in its own color scheme was really fun and pretty.
Our hotel lobby was beautiful with all of the decorations done in white and silver to complement the dusky blue color scheme of the furniture.
The part I loved best were the flower arrangements. They had huge bouquets of white football mums in glass vases with a few silver pinecones tucked in to make it festive. It was so simple yet so elegant and beautiful.
Have you been inspired by any decorations that you have seen this year? Do you do any decorating around your home for the holidays?
 Sunday, December 23, 2012 at 11:44AM | Posted by
  Lisa |
  4 Comments |
  Share Article |
  Email Article |
  Print Article
 Westland Tai Poutini National Park
South Island, New Zealand
9.15.2005
 Saturday, December 22, 2012 at 7:06AM | Posted by
  Lisa |
  Post a Comment |
  Share Article |
  Email Article |
  Print Article
Machu Picchu, Peru
11.2007
 Friday, December 21, 2012 at 7:03AM | Posted by
  Lisa |
  2 Comments |
  Share Article |
  Email Article |
  Print Article
 Frank's middle niece is ten years old and a pastry chef in the making. She loves to cook and especially loves to bake. She's always asked me a number of questions about cake decorating and even helped me decorate the Thanksgiving cake last year. I thought that for Christmas this year I would put together a beginning collection of her own cake (and cupcake) decorating supplies.
I didn't like any of the plastic decorating toolboxes that I saw available so I decided that I would make my own. Originally I planned on building my own box, but when I saw the perfect sized unfinished wooden box at Michael's I decided to buy it and just build the interior of the box to hold the supplies.
The first thing to build was a little caddy to hold the gel colors. I had a lot of frustration while building this but I'll outline what worked first and then explain what mistakes I learned along the way.
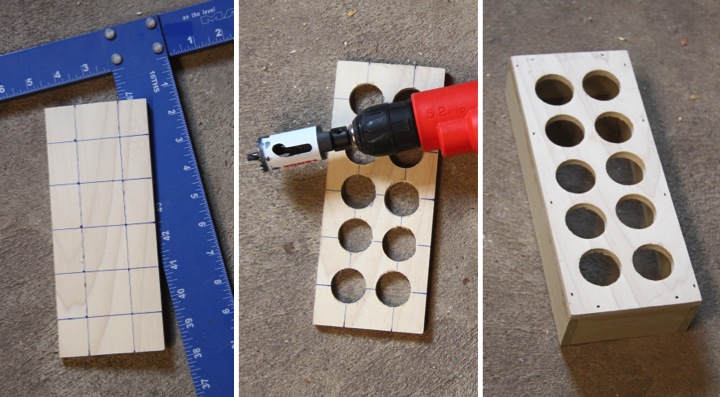
The box was 8-1/2" deep so I cut a piece of 1/4x4 craft board 8-1/2" long. I then marked center points for drilling my holes by drawing lines 1" from the outside edge, 1-1/4" from the top and bottom edge and then 1" spacing vertically between those lines. To make the holes I first pre-drilled a small hole at each line intersection and then used a 1-1/4" hole saw to drill the holes. I then finished up by building a box base with 1/4x2 craft board (2 pieces at 8-1/2" for the sides and 2 at 3" for the ends), attaching everything with wood glue and brad nails.
What I learned didn't work was mis-measuring the size of the gel color containers, using a 1-1/8" hole saw and then not realizing that the gel colors won't fit until you have already finished building the caddy. Also, trying to line up the hole saw without the pre-drilling the pilot hole led to a mess with the holes not lining up properly. All in all I had to build the little caddy three times before I got it right. That's what happens when you are tired and not thinking things through...

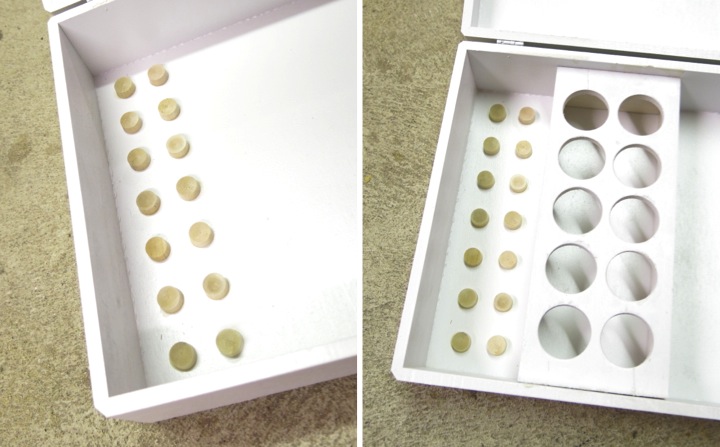
I filled the nail holes of the gel color caddy with wood filler and then sanded it and the box smooth. I wiped everything down with a tack cloth and then gave both pieces a coat of white spray paint with primer. I did this because I wasn't sure if I would be able to evenly coat the area under/inside the gel color caddy with paint after it was assembled.
Once everything was dried I moved onto the area to store the decorating tips. At first I thought of cutting down a dowel but then had the idea to use 1/2" wooden hole plugs that I picked up at the hardware store. I lined them up with the wide side down in two rows along the left side of the box using some wood glue to attach them.
After the hole plugs were in place I put the gel color caddy inside the box, securing it with some wood glue and a few brad nails. I used some more wood filler to cover up the nail holes and fill in the seams where caddy met the box and then sanded everything smooth.

With the box built it was time to finish it. I used a few light coats of white spray paint of the inside and outside of the box.
I decided to add a stripe across the top of the box in purple which is Frank's niece's favorite color. I marked off the space with some painter's tape and then used some purple acrylic craft paint and a foam brush to paint the line. Since the color was dark it took three thin coats to get nice coverage.
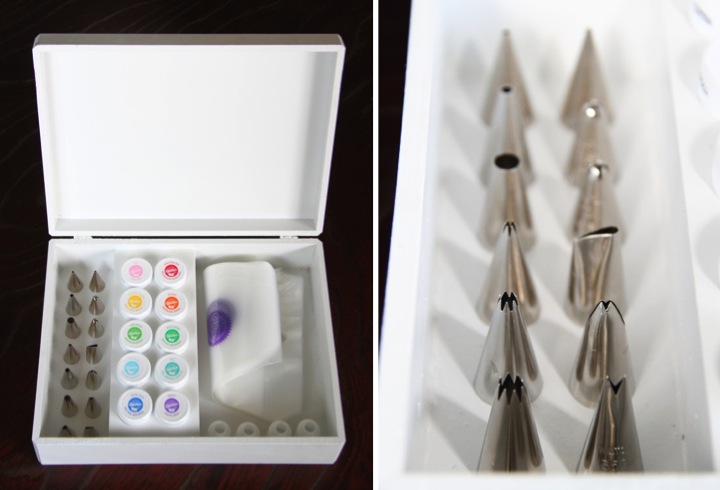
I used some foam stickers to add the word "decorate" to the top of the box and it was ready to fill up with cake decorating supplies. I picked out a variety of gel colors and a bunch of decorating tips to put in the box. On the right side I added some 12" disposable decorating bags and some couplers.
I am so excited to give this to Frank's niece (along with some pretty decorating books) and show her some techniques. I hope that she likes it!

 Thursday, December 20, 2012 at 8:22AM | Posted by
  Lisa |
  4 Comments |
  Share Article |
  Email Article |
  Print Article
Szentendre, Hungary
5.29.2006
 Thursday, December 20, 2012 at 7:05AM | Posted by
  Lisa |
  Post a Comment |
  Share Article |
  Email Article |
  Print Article
 Since my little episode on Sunday morning I have being feeling a bit off which is probably to be expected. I was in need of some comfort food, which due to my heritage on my paternal side means Eastern European food to me, so Frank and I headed to the Polish Village Café in Hamtramck on Tuesday night for dinner.
The restaurant dates back to 1976 and is such a cute, cozy place in its cellar location. It totally reminds me of a place that my grandpa would have taken me as a kid. As an added bonus it was all decorated for the holidays with greens, twinkle lights and ornaments dripping from the ceiling.
To start Frank and I both had dill pickle soup. It was one of the best I have had with nice big chunks of potatoes and shredded carrots making it quite hearty.
For dinner I had the Polish Plate which was a sampler full of many of my favorites, stuffed cabbage, pierogi, kielbasa, sauerkraut and mashed potatoes. Frank got a combination plate with stuffed beef rolls, pan-fried chicken livers and stuffed cabbage. Everything was spectacular but Frank and I agreed that the stuffed cabbage was the best.
For dessert I couldn't resist ordering sweet cheese filled nalesniki. Nalesniki are Polish crepes which are served with filling inside and then fried in butter until crispy.
When I was really little my dad brought home sweet cheese nalesniki from the Polish Deli to try for the first time. I didn't want to eat it because I thought the name sounded funny, but of course once I tried a bite I loved it. Being a proud little kid I pretended that I didn't like it but that I was continuing to eat the nalesniki because I had to. I don't think my dad was fooled by my charade and ever since it has been a favorite food of mine.
The nalesniki at Polish Village Café was absolutely wonderful and brought me straight back to my childhood. It was a great way to end a delicious meal. Sometimes comfort food is just what the doctor ordered.
 Wednesday, December 19, 2012 at 5:30PM | Posted by
  Lisa |
  6 Comments |
  Share Article |
  Email Article |
  Print Article
 North Shore, Oahu, Hawaii
2.05.2005
 Wednesday, December 19, 2012 at 7:04AM | Posted by
  Lisa |
  Post a Comment |
  Share Article |
  Email Article |
  Print Article
 For Frank's oldest niece, who is 13, I decided to make a jewelry stand and small DIY earring kit (I'll share it in another post) for Christmas this year. I thought it would be fun to make a triptych with a place for earrings in the middle and necklaces on the sides, sketched out a basic design and got started building.
The first step was to make the frames. I bought some 1x2 pine boards and cut my pieces with a 45 degree mitre on the ends. I cut 6 pieces at 11.5" for the sides, 2 at 10" for the top and bottom of the middle frame and 4 at 8.5" for the top and bottom of the side frames. I did a dry fit to make sure that everything fit together nicely and then used glue and brad nails to assemble the frames.
I used wood putty to fill my holes from the nails, sanded down the frames, wiped them with a tack cloth and gave them a coat of primer.
Next, I tackled adding the necklace hooks to the side frames. I chose tiny white 1/2" cup hooks since I thought they looked cute and dainty. I marked where I wanted my cup hooks to go with a 1" spacing between hooks and 3/4" from each edge and then used a 1/8" drill bit to predrill a hole in each spot. I started each hook with my fingers and then tightened them down using a small pair of vice grips.
My next step was to add the metal mesh to the center frame for the earrings to hang from. I had some leftover perforated metal from making my bathroom vent cover which I thought would be perfect. I used my tin snips to cut a piece of the metal down to the right size and placed it on the back of the frame. I cut some pieces of screen molding to cover the rough edges and then used some wood glue and my brad nailer to attach it over the top of the perforated metal. I used wood filler to fill the nail holes and sanded it smooth.
With each of the frames complete it was time to assemble everything. I used some small 1" hinges to join the frames together. I started by measuring up 1-1/2" from the ends on each side of the middle frame, positioning the hinges, and then marking where the screw would go. I then predrilled holes on the marked spots and used a precision screw driver to attach the screw hinges. Next, I lined up the side frames with the middle frame and repeated the process of marking where the hinge screws would go, predrilling holes and finally screwing in the hinge screws.
With my jewelry stand completed all that was left was a few coats of white spray paint to finish it off. I wanted to keep the perforated metal silver so I masked it off with painter's tape before spray painting.
I think that the jewelry stand turned out cute and I hope that Frank's niece likes it. I know I would have enjoyed it when I was 13!
How are your holiday presents coming along? Are you making anything fun?
 Tuesday, December 18, 2012 at 5:19PM | Posted by
  Lisa |
  5 Comments |
  Share Article |
  Email Article |
  Print Article
Cape Point, South Africa
8.04.2004
 Tuesday, December 18, 2012 at 7:03AM | Posted by
  Lisa |
  2 Comments |
  Share Article |
  Email Article |
  Print Article