Welcome

My name is Lisa and I'm a crafty girl with wanderlust working as an engineer by day. My blog chronicles projects in my home as well as pictures and stories from my travels.

Search


Instagram

Blog Index
The journal that this archive was targeting has been deleted. Please update your configuration.
Navigation
Wednesday
Jun262013

Surviving Summer with Japanese Soft Cream

Japan in the summer is a very hot and humid affair. The area where I lived in central Honshu was pretty miserable in the summer months. The closest thing that I can liken the weather to would be someplace like Georgia in the U.S. You are probably thinking that wouldn't so bad but that is because people in Georgia use air conditioning. Not to say that there isn't air conditioning in Japan, it is just that they use it much more sparingly. By that I mean that if it was in the nineties outside my office would be cooled down to the low eighties. When you also factor in that I would walk to and from the train station and that the train was not air conditioned at all, I would pretty much spend every day a hot sweaty mess from June through September.

On the weekends when I would be traveling around it would be even worse since I spent even more time outside walking around. My saving grace through the summer heat was eating Japanese soft cream and eating it often.

Soft cream (ソフトクリーム, sofuto kuriimu) is a Japanese version of soft serve ice cream that is a little less sweet and more creamy than its American counterpart. I've never been a huge soft serve fan back at home, but part of that is that typically in the U.S. we only have chocolate, vanilla and swirl which is boring when you can have double chocolate chunk cherry ice cream. Soft cream is not only a bit richer than soft serve but also comes in a crazy variety of awesome flavors.

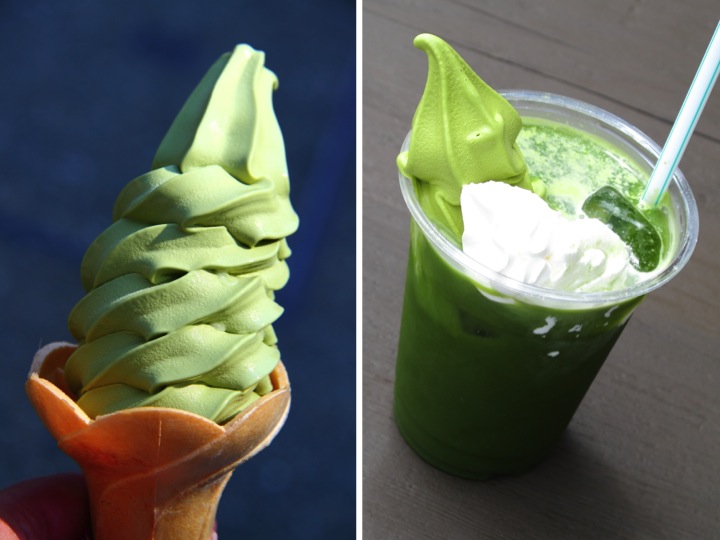
Through my anecdotal experience the most common soft cream flavor is green tea. Green tea (抹茶, matcha) is a very popular flavor for sweets in Japan. I didn't know this on my first business trip to Japan back in 2006 so being an American I thought that the pale green was mint. Haha! I got a cone and was quite surprised. Green tea has a bitter taste so it wasn't something that I immediately loved right off the bat, but green tea soft cream eventually became one of my favorites. The photo below on the left is a plain green tea soft cream cone while the one on the right is a float made with green tea soft cream. Yum!

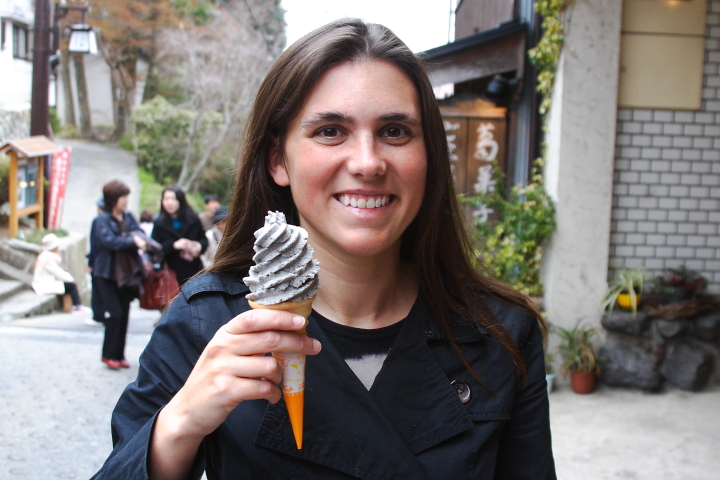
I love trying fun flavors that I happen upon. Here's a photo of me eating a black sesame (黒ごま, kuro goma) soft cream on a rainy, April day in Yoshino. Just because I need soft cream in the summer doesn't mean I don't succumb to its charms in other seasons as well. The black sesame was super tasty but it turned my tongue black.

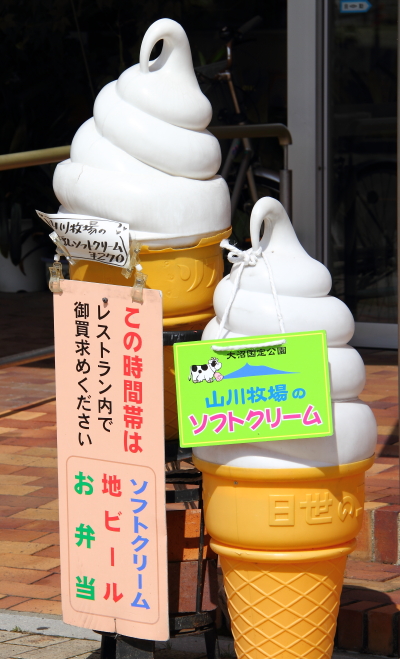
One of the most memorable soft cream stands that I stumbled upon was near Onuma Koen (大沼公園), a National Park in Hokkaido. It was blisteringly hot out and I couldn't resist all of the cute cone statues decorating the top of the stand.

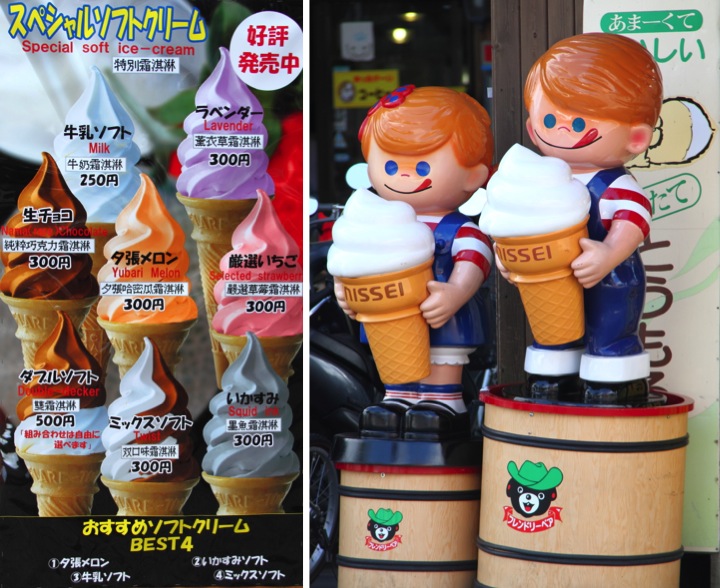
Several unique flavors representing foods that Hokkaido is famous for in Japan were featured. Never one to pass up trying a new soft cream flavor I decided that I absolutely needed to eat the lavender before my hike in the park and then treat myself to the squid ink (イカ墨, ikasumi) soft cream after I was done. I loved them both! Also, please note that squid ink soft cream, like black sesame, will also turn your tongue black.

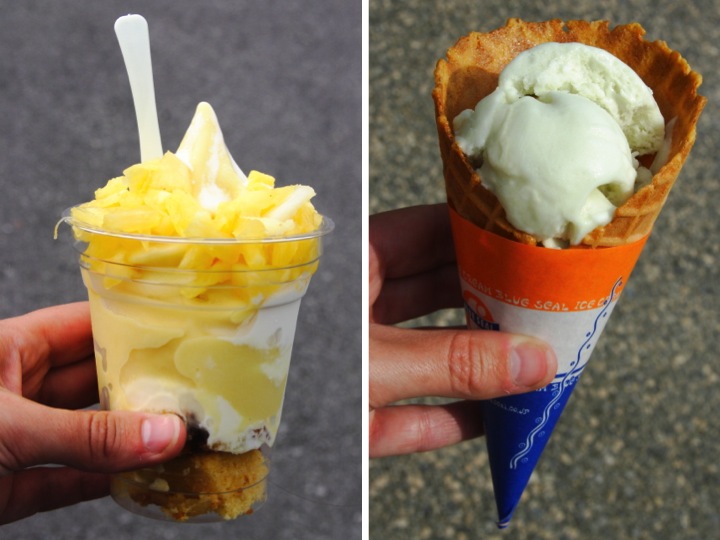
Moving from the northernmost prefecture, down to the southernmost, I also tried some great flavors during a weekend trip I took to Okinawa. Okinawa is well known in Japan for its pineapples so while I was there I just had to visit the adorably kitschy Nago Pineapple Park (you just can't beat an automated tour in a cartoon pineapple shaped car through pineapple fields). They had a pineapple soft cream sundae topped with fresh pineapple that was absolutely delicious. Although it isn't soft cream I also can't fail to mention my bitter melon Blue Seal ice cream cone. Blue Seal is a popular ice cream chain in Okinawa and bitter melon (ゴーヤー, goya in Okinawan; 苦瓜, nigauri in Japanese) is a common ingredient in Okinawan cuisine so I simply had to try it. It was definitely quite bitter with a little sweetness and although it was a bit unusual for me I really liked it.

As you may have noticed I could reminisce forever about all the different wonderful flavors of soft cream that I have had the pleasure of enjoying (purple sweet potato or cherry blossom, anyone?). I'll wrap this up by recommending that any visitors to Japan should definitely not pass up the opportunity to sample some local flavors of soft cream during your trip. You won't regret it!

Wednesday
Jun262013

Picture of the Day: Baby Baboon Getting a Ride From its Mother

Kruger National Park, South Africa
7.29.2004

Tuesday
Jun252013

Porch Garden Bed for Summer 2013

After sharing the transformation of my front tree bed last week I thought I would also share how things are shaping up with the plants for my porch garden bed.

This garden bed is always a bit of a struggle for me because of the wide range of lighting conditions. The front is heavily shaded by the two huge trees in my front yard, however the side gets full sun all day. Don't even get me started about trying to deal with the corner section.

Trying to figure out a cohesive design with plants that work in the various areas of the bed has been a bit of trial and error for me over the past few summers. I try new things and see what thrives and what doesn't. Of course I do some research about what conditions work best for a plant before I try it in a location, but that isn't always a surefire guarantee. I'm sure I will always be tinkering with this garden bed.

Across the front I have three boxwood shrubs. They seem to do well there and I like that they stay green over the long Michigan winter. Last year I planted some starfire dahlias for color in front of the boxwoods but the bunnies in my yard really enjoyed biting off the flower buds so I chalked that up to a failed experiment. This year I decided to go back planting New Guinea impatiens which have worked well in that spot in the past. The bunnies seem to leave them alone and they are happy in the shade.

For the past two years on the corner I have planted pink mandevilla which has worked really well. I wanted to do again this year, but I couldn't find a decent plant at the nursery. I spotted some calla lilies on sale at Lowe's however, and thought that I would give them a shot. I've planted them with success in between the boxwood before, but this spot is a bit sunnier so we will see how things go.

Along the side I have some small shrubs that I thought I killed back in the summer of 2011 when I was traveling around Southeast Asia for three weeks and they didn't get any water. Last year I pruned back the dead branches and they are really thriving now. I like that they have a different shape from the boxwood but the leaves are similar making it a nice tie-in. I also planted some pink superbells in front of the shrubs that I tried in that spot and worked well last year.

Up on the porch I have a few hanging baskets of fuschia and petunias. I am not a big fan of plastic planters so this year I repotted the plants in white metal Socker hanging planters from Ikea. At only $4.99 each they look nicer than the plastic and were pretty inexpensive as well.

I've had everything planted for a little bit with everything doing well so far. I'll just have to wait and see how the bed continues to grow over the rest of the summer.

If you are curious for reference, here is the same garden bed from last summer.

How is your summer gardening coming along? Do you have any difficult spots with mixed light?

Tuesday
Jun252013

Picture of the Day: Leaves in El Yunque Rainforest


El Yunque Rainforest
Puerto Rico, United States
2.18.2007

Monday
Jun242013

Beadboard Ceiling for the Downstairs Hallway

This weekend I gave a little love to a very neglected area of my house, my downstairs hallway. Like every other room on the first floor the ceiling was covered with ugly cardboard ceiling tiles. A while back I had removed them. This was no easy task because as I pulled down the first drop ceiling I found a second drop ceiling before uncovering the original crumbling plaster ceiling. After the demo work was done (I love my prybar!) I had gained a nice bit of extra headroom but then I stalled on the project and moved on to other things.

This weekend I finally got around to tackling the hallway ceiling again. I had previously decided that I wanted to put up a wooden beadboard ceiling. The first reason is that it is a pretty boring hallway with five doors along it and I thought that a beadboard ceiling would dress it up a bit. The second reason is that I hate taping and mudding drywall, especially on the ceiling so installing a beadboard ceiling instead of drywall would get me out of that.

In order to put up the beadboard I needed a plywood substrate for me to nail the strips of beadboard into. Frank and I headed over to Lowe's yesterday afternoon, bought two sheets of plywood and had them rip it down to size on the store's panel saw. I didn't need it to be super accurate (I would never have one of the box stores cut down anything that required precision) and it made it much easier for hauling. Also, as a side note, if I ever become rich I want my own panel saw.

Back at home I cut out a hole for the light fixture junction box with my jig saw and then Frank and I screwed the first piece of plywood into the joists. Frank is a foot taller than me so he could just reach up to hold it in place while I needed a stool. He's lucky like that. The plywood was somewhat awkward to get up, but once it was in place I was ready to install beadboard. I apologize for the terrible pictures in this post, but there is no natural light in the hallway and I was using work lights. 

Making sure that you have the first piece square to the walls is super important because if it is off the whole ceiling will look crooked. Unfortunately, one of the joys of owning a house that is over 130 years old is that absolutely nothing about it is square. I took several measurements and got things lined up the best I could and then drew a pencil line on the plywood where I wanted to align the first piece of beadboard. I looked at the line from a bunch of vantage points in the hallway to make sure it looked like it was square to my slightly wonky walls and then put up the first piece.

To start I aligned a piece of beadboard to the line I had drawn with the groove facing the back wall and the tongue facing me. I then used my brad nailer to nail the first piece in along the face. For all the pieces after that I slid the groove snugly into the tongue of the previous piece and then nailed it up, but along the edge of the groove at an angle. If you nail it at that spot the next piece of beadboard will cover up the nail holes so you only have to patch the holes on the face of the first piece. You have to shoot the nail at an angle because it you went straight through you wouldn't be able to slide the next piece on over the tongue. It took me a board or two to figure out where exactly I had to line up my nail gun to shoot the nail in the exact right spot but once I did I was on a roll.

When I reached the light fixture junction box I needed an accurate way to make a fairly precise cut out. For the hole in the plywood I had just measured and cut a hole that was a bit on the large size. Having it be rough didn't matter that much for the plywood since it was going to be covered with beadboard. The beadboard hole, however, needed to be fairly spot on.

My first step was to rummage around the house to find something with the same dimensions as the junction box, which just so happened to be a little green bowl from the kitchen. I slid the first piece of beadboard that would overlap the junction box into place and lined up the green bowl over the junction box, tracing around the bowl where it hit the beadboard. I then removed the board, put it on the floor and slid in a second piece of beadboard next to it. I placed the green bowl on top, aligned it with the mark on the first board and traced all the way around it onto the second board. From there it was just a matter of using my jig saw to cut along the lines and nailing the pieces in place. It isn't perfect, but it isn't too bad and the base of my light fixture will easily cover the edges.

I got about eight feet of the ceiling done today. Another piece of plywood and another eight feet of beadboard and I will have it all up. So far I am pretty excited about how it is coming along. The edges look a little rough, but that is becuase I knew it didn't matter to have exact cuts since my next step is to add a thick crown molding around the top to hide where the drywall stopped because of the second drop ceiling. It may not look like much to an outsider but to me it is progress!

In the near term my next steps are to finish the beadboard ceiling, install crown molding, paint the walls and ceiling and hang light fixtures. Longer term, I plan to get rid of the modern looking door trim and hollow core doors and replace it all with trim to match the rest of the house and solid five panel doors like I have upstairs. I also need to figure out what to do with the floor, but that is a worry for another day...

Friday
Jun212013

Picture of the Day: Temple Roof Ornament in the Marble Mountains 

Marble Mountains, Vietnam
8.11.2011 

Wednesday
Jun192013

Picture of the Day: Seagulls at Sunset on Treasure Island


Treasure Island, Florida
12.30.2012 

Tuesday
Jun182013

I ♥ Red Telephone Boxes (or The Time I Was on BBC1)

I love red telephone boxes. Along with red post boxes and red double decker buses, they seem so quintessentially British to me as an American. Someday I would love to have one for my house. I'm not sure what I would do with it, but it would be really neat and a double decker bus is out of the question since it would be too tall for my garage.

Back in June 2005 while I was in London for a conference for work I ended up being on the BBC London News on the BBC1 television channel due my admiration for red telephone boxes.  I love all things BBC, especially listening to the BBC World Report on the radio, so I was really excited. 

On the last day of my conference the sessions ended at 1:30 pm so I decided to spend the afternoon sightseeing before meeting up with some friends at their flat for dinner. I planned ahead and brought a pair of flats and wore a t-shirt under my suit jacket so I could do a quick change and be on my way. Sometimes I am smart like that. Other times not so much. Like the day that I had off before the conference started when I decided to take a day trip to the Cotswolds and got lost walking in the countryside for a few hours resulting in terrible blisters and almost missing the last train back to London.  

Anyway, back to the story at hand. One of the places I wanted to go to see that afternoon was St. Paul's Cathedral because when I was visiting in 2003 the front was undergoing restoration.  On the cathedral grounds there was one of the old style red London telephone boxes so with me being me I couldn't help but take some photos.

The next thing I knew a BBC reporter, Karl Mercer, and his cameraman were asking me if I would mind if they taped me photographing the telephone box.  They explained that they were doing a story about the traditional London telephone boxes for the evening news.  There was a movement to reduce their numbers due to the rise in cell phone usage along with replacing some with more modern telephone boxes, however there were also people who felt they should be kept as part of the cultural heritage.  The cameraman taped me taking photos from a few angles and Karl interviewed me about why I liked the traditional telephone boxes.  They were really nice and even posed for a photo with me.

When I got to my friends' flat I asked if we could turn on BBC1, telling them the story of my adventure with the phone box.  Sure enough, at a few minutes before seven the telephone box story aired with short clips of a variety of people they had filmed that day including the Lord Mayor and me (refered to as "Lisa from California.")  I had been worried that I would come across sounding vapid on film but the story turned out well and now I can say I was on the BBC.

I figured that I couldn't end this post without mentioning the most interesting locale with a red telephone box that I have come across. This past November when I was visiting my sister on St. Thomas we spent some time in the BVI. As our boat pulled up to Marina Cay for us to have lunch, lo and behold, there was a red telephone box perched on the end of the dock. Not only is the phone still in working order, there is also a webcam focused on it so you can take a look at what is going on at the telephone box at any given time online.

Long live red telephone boxes!

Tuesday
Jun182013

Picture of the Day: Mangos for Sale at Mercado Bazurto


Cartagena, Colombia
3.09.2013 

Monday
Jun172013

Front Tree Bed Makeover

This weekend I worked on some gardening around the house. About four years ago I made a bed around the base of the tree in my front yard since no grass seemed to be able to grow there. Unfortunately, due to some neglect this year a bunch of weeds and grass had made the bed a huge overgrown mess that was in dire need of some help.   

Because I had let it go for so long it was quite a lot of work to clean it up. I had to use a shovel and trowel to dig everything up to get at the roots. I also removed all of the stones to pull up grass that had grown in between the rock border.

After about an hour I had the whole bed cleaned up and cleared of all the weeds. Much better!

I was thinking of putting some ferns in, but when I got to Lowe's I saw that they had these pretty blue green hostas for only a dollar in the clearance. They were a little rough looking but they were basically healthy plants and it only took me five minutes to trim the dead leaves and make them presentable. Beside the hostas, I bought some New Guinea impatiens to add a little color for the bed.

I'm not keen on measuring so I usually just place out my plants and move things around until I have everything where I want it before I start digging.

After I finished planting the hostas and impatiens and added some mulch the front tree bed now looked like this.

I can't wait until the hostas start to fill in.

This was definitely a much needed item to tackle on my to-do list around the house. It makes it so much nicer to walk up to the front of the house and see a neat garden bed around the tree instead of a mess of weeds.

Have you been working on any gardening projects around your home? Do you hate weeding as much as I do?