Welcome

My name is Lisa and I'm a crafty girl with wanderlust working as an engineer by day. My blog chronicles projects in my home as well as pictures and stories from my travels.

Search


Instagram

Blog Index
The journal that this archive was targeting has been deleted. Please update your configuration.
Navigation

Entries in Building (16)

Sunday
Apr152012

DIY Grow Light for Starting Seeds

Every spring I mean to start some seeds indoors for my garden, but each spring comes and goes and I never seem to be able to find enough time to get around to it. This year, however, I decided was the time to finally make it happen.

I got some flats and soil for seed starting and picked out some fun packets of seeds to try but then I was stumped when it came to finding a grow light. I didn't see anything that I liked that was in the price range I was willing to pay so I ended up making the grow light myself.

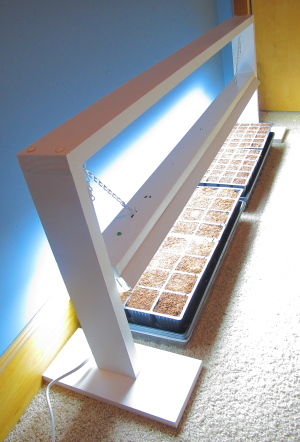
The concept I came up with is just a simple frame that holds up a fluorescent work light. I made the plans using 2x4s, but I actually ended up using some scrap wood that I had in my garage that wasn't quite as thick but was free. This is a pretty good project for using scraps and I actually only had to buy the light fixture, bulbs and wooden button plugs for a total cost of about $15.

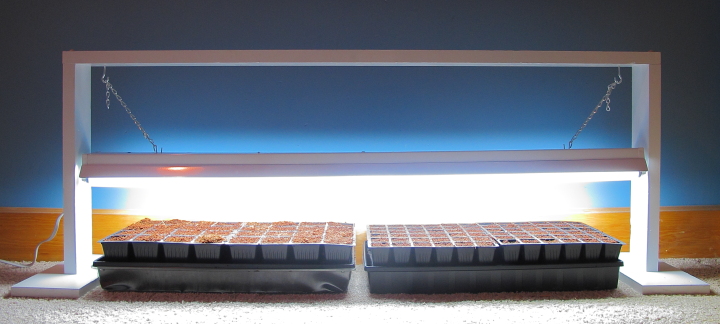
With the 48" light I can easily fit two flats under the grow lamp. By using button caps to hide my screw holes, I can easily disassemble the frame to store it after spring. The chains on the work light hang from J hooks so I can adjust the height of the light as my seedlings grow. Making the grow light took me less than an hour, not including time for paint drying and I am happy with how it turned out. Hopefully my seeds like it, too!

Supply List:
1 - 2x4 @ 8 feet long
1 - 1x6 @ scrap at least 2 feet long
1 - 48" fluorescent work light
2 - Daylight fluorescent bulbs
4 - 3/8" wooden button plugs
2" screws 

Cut List:
1 - 2x4 @ 53" for top
2 - 2x4 @ 20" for side supports
2 - 1x6 @ 12" for base feet
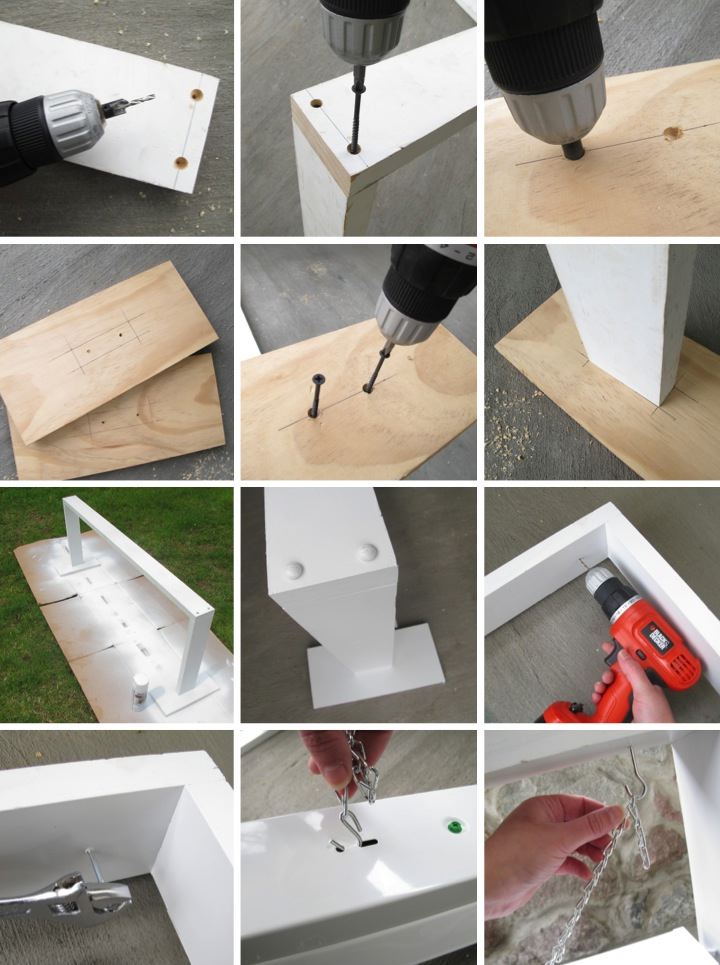
Frame Assembly:
To start the frame I used a countersink bit to drill two holes on the top of each end of the top piece. I then used 2" screws to attach the top to the side supports.

Base Assembly:
On each base foot I marked out where to drill on one side and where the side support would be positioned on the other side. I used a countersink bit to then drill two holes in each base foot and started the 2" screws in the holes. I then lined up my markings with the side supports and attached the base feet by driving in the screws the rest of the way. 

Finishing:
To finish the stand I primed it and then used three light coats of white spray paint. I did not fill in my screw holes at the top of the frame since I wanted to be able to take off the top piece for easy storage. Instead, to hide the holes I spray painted some wooden button plugs and pushed them into the holes. I can then remove the plugs when I need to access the screws for disassembly.

Lamp Assembly:
I drilled two small pilot holes in the bottom of the top piece of the frame for the J hooks at the distance indicated in the work lamp assembly instructions. It was 45" apart for the lamp I used, but if you are doing this check your instructions as they could vary. I started twisting in the J hooks into the holes by hand and then finished tightening them using a wrench.

Once the J hooks were attached I put the bulbs into the light fixture and slipped the chain hooks into the holes at the top of fixture. I finished hanging the light by slipping the chain onto the J hooks.

Once my grow light was done I was pretty eager to plant some seeds. I chose two different types of sunflowers, one that grows really tall and one that is a deep red color. I also planted zinnias in a variety of warm colors and a selection of lettuces. I can't wait for everything to sprout!

Have you started any seeds this year or in the past? Has it worked well for you? What did you plant?

Saturday
Feb182012

Simple DIY Shower Stool

As I have been working on finishing up projects in my master bathroom as part of my New Year's resolutions I found a few extra items that I wanted to do before I would feel like the bathroom is complete. One of those additions was to make a shower stool for my shower.

I love my 3' x 5' shower and with all that space I thought that having a little spot to sit down would be really nice. After looking around online and at some stores I couldn't find anything that I liked that was also reasonably priced so in the end I decided to make my own.

The design is a pretty standard stool design, just made to fit shower dimensions. Completed it stands at 18" tall, 15" wide and 11-1/2" deep. To assemble everything I used pocket holes made with my Kreg Jig which is an awesome tool I learned about on Ana White's amazing and inspiring website. All the pocket holes were under the seat and inside the aprons so I didn't have any holes to patch which was really nice.

It only took about an hour to build the shower stool not including drying time for the spray paint. I already had screws so with the lumber and spray paint I spent less than $20 on the project. I am happy with the results and I think it looks cute in my shower as well as being functional and sturdy. 

Supply List:
2 - 2x2 @ 3 feet long
2 - 1x3 @ 6 feet long
1-1/4" pocket hole screws 

Cut List:
4 - 1x3 @ 10" for seat slats
2 - 1x3 @ 11-1/2" for seat sides
2 - 1x3 @ 11 for front and back aprons
2 - 1x3 @ 7-1/2" for side aprons
4 - 2x2 @ 17-1/4" for legs

Seat Assembly:
To start I drilled 2 pocket holes on each end of the four seat slats. Leaving 1/2" between each slat I clamped and screwed the slats to the sides.

Leg and Apron Assembly:
For each of the aprons I drilled 2 pocket holes on the ends (for attaching to the legs) and then a few more pocket holes along the top edge (for attaching to the seat). Using a scrap piece of 3/8" plywood as a guide, I marked lines on each of the legs  3/8" in from the edge as guidelines for aligning my aprons.

I lined up the front apron to one of the legs, clamped it and then screwed them together. I then attached another leg to the other side of the apron in the same manner. I attached the back apron to the remaining two legs using the same process as the front.

I clamped and screwed the side aprons onto the front legs and finished making the base by then clamping and screwing the back legs to the side aprons.

Finishing Up:
I laid the seat face down and then centered the base on top of it. I used the already drilled pocket holes to screw the seat and base together. 

With all the pocket holes under the seat or inside the apron I just did a light sanding on the piece before finishing it. I used a dark grey spray paint primer on the stool first before applying two light coats of black spray paint.

If you are interested, check out the rest of my bathroom posts here: Bathroom Blog Posts

Tuesday
Feb072012

Adding Shelves to My Built-In

With the top of my built-in gussied up with wallpaper it was time to get to work on making the bottom cabinet more functional by adding shelving. Just like hanging my medicine cabinet, this project also addresses both facets of my 2012 resolutions of getting organized and finishing up projects around the house.

Adding the shelves was pretty easy to do with the only trick making sure to get everything level. I started by picking up a six foot long pine 1x8 board to use for the shelves and some shelf supports from the hardware store. I measured and cut the boards to length and then held them up inside the built-in to get a rough idea of where I wanted them.

I aligned the level where I wanted my shelf to be on the left side of the cabinet and then applied a piece of painters tape directly underneath it which gave me a level guideline. I then measured up the distance from where the board rests to where the peg is located on the supports and drilled holes at that spot 1-1/2" and 6" from the back of the built-in. I put the supports in the holes and then used my level again to check that it was level.

To get the placement for the right side I put one of my shelf boards on the supports that I had installed, put the level on top of it and then adjusted the board until I got it level. I then put another piece of painters tape underneath the board to mark the level line and measured and drilled the holes in the same way that I did for the left side. I put the supports in the holes on the right side and then repeated the whole process for the second shelf.

After priming and adding two coats of paint to the shelves I was all set to start organizing my built-in cabinet. On the top shelf in the left corner I have two cardboard bins that cost a dollar from Target. One has some basic medicines and band-aids while the other has extras of things like razors and soap. Moving across the top shelf I have a little teal dish that I already owned holding my cleaning sponges and then all my bathroom cleaning supplies.

My middle shelf is organized with metal baskets that I also found at Target. The leftmost basket has things that I don't use very often like suntan lotion, bug spray and nail polish remover. The other two baskets hold my sample sized items. Whenever I stay at hotels I always take the mini shampoos, lotions or whatever else may be offered to guests in the bathroom. They are great for packing on my travels or if I have a house guest that forgot something. Over time I had amassed a ridiculous amount of hotel toiletries so I decided to pare things down to just these two baskets with liquid items like shampoo and conditioner in the middle one and dry items like bars of soap and hair brushes in the right one. 

Finally on the bottom shelf I have my extra bath towels and toilet paper. It feels good to have everything organized and by limiting myself to the space available it forced me to go through what I had and throw out a lot of things that I just didn't need. Nail polish that changes color in the sun? Gone. Twenty hotel shower caps? Maybe keeping three is enough. Now I just need to keep everything this way!

Is anyone else out there trying to get organized? How is it going? Do you have any tips to share?

If you are interested, check out the rest of my bathroom posts here: Bathroom Blog Posts

Thursday
Jan052012

Patio Furniture in Progress

One of the unfinished projects that I want to complete as part of my New Year's resolutions this year is to finally finish up my patio furniture. In the summer of 2010 I had a contractor put in a patio in my backyard. I looked into doing it myself but since I wanted something a little complicated (a half circle built up off the ground) when I priced out how much materials and equipment rental would be it just didn't make sense.

Patio furniture was a completely different matter. I was in love with the West Elm wood-slat sectional but there was no way I could justify a few grand for patio furniture. It looked like a pretty simple design so I thought I could build it and doing some internet searching brought me to Ana White's fabulous website. She has all sorts of simple furniture plans for knock-off versions of catalog favorites as well as some original designs. This is not New Yankee workshop, but it is easy with beautiful things you can build yourself and it is really inspiring.

Just my luck, Ana had plans for both the armless section and corner section of the outdoor sectional. I bought out the cedar 1x4s at my local Lowe's and got building. The thickness of my boards was a little different than what Ana assumed in her plans so once I got going I realized that I had to make some minor adjustments to my cuts for everything to fit, but other than that it was very straightforward. I used my Kreg Jig to join everything together with pocket holes which made things easy and meant less holes to fill in later. Since I made a lot of sections (six armless, two corner) I did everything assembly line style which sped things up for me.

After I finished building the sectional I made a coffee table as well as a dining table that I designed to match with the same slat design as the sectional for the top. Unfortunately, that is where I stopped. I bought 3" outdoor foam (from Foam N' More) and outdoor fabric (from JoAnn's during a 50% off sale) but I just never had the time to make the cushions or paint the furniture that I built. I have loved the furniture and it has gotten a lot of use the way that it is with barbecues and relaxing in the backyard, but this summer I really want to get it all done. Wish me luck!

Friday
Dec162011

Making the Easiest Bookshelf

After sharing a few items sitting on top of the bookshelf in my livingroom I thought I would share how I made the bookshelf itself.

For the shelves of the bookcase I bought two sets old bi-fold doors from my local recycle center for $5 each. I cleaned up the doors, removed the hinge and knob hardware and patched and painted over the holes left from the hardware. Alternately you could use wood boards but I opted for the cheaper route. 

To support the shelves I made columns of bricks. Colorwise the concrete bricks I bought didn't exactly fit in with my living room so I used some cream spray paint to get the color I wanted. As a tip, once you stack the bricks only three faces will show so you can conserve spray painting by only painting those faces.

For stability when building the bookcase it is important to stack the bricks in pairs, alternating the direction as you stack. It's also necessary to use some L-brackets to anchor the shelves to the walls and I wouldn't build it taller than I did (about halfway up the wall). 

All told, the project, not including paint drying time, took about an hour of hands on time and cost me about $35. Not too bad for a custom bookcase! 

Monday
Nov282011

Kitchen Island for Mom

As I am getting in the swing of planning out my Christmas gifts for this year I thought I would share the gift I made for my mom for her birthday/Christmas gift last year.  She and her husband were in the final stages of remodeling their kitchen and the last item they needed was a kitchen island so I decided to build it for them as a gift.  

I started by repurposing two old cabinets as the foundation for the island. They were different depths so I build out a frame to make it square and then boxed the cabinets in with a sturdy piece of plywood on the back and beadboard on the sides. The hinges to the doors from the cabinet were removed and retrofitted with a rev-a-shelf to allow for easy access to a pull out a garbage and recycling bin.

On the backside I came up with the idea of making an open bookshelf for my mom to store her cookbooks and other knick-knacks since she already had plenty of seating in her kitchen. I made the posts by taking 2x2s and wrapping them with 1x6s (for the top), 1x10s (for the bottom) and some scrap molding. For the shelf I screwed a ledge into the back of the plywood and attached it to the posts using my Kreg Jig.

To finish it off the holes were patched with wood filler and sanded down.  With a few coats of white paint and new hardware it was almost complete.  For the top my mom wanted butcher block, so she had a piece of the Ikea Numerar in oak cut to size (I got the leftover scrap for a project for my kitchen) and mounted that for the countertop. 

Along the way I wasn't sure if it would come together well and there were a number of frustrating times (including a chop saw that wasn't cutting square and a wrong molding cut that almost made me run short on molding to wrap the posts) but the end product turned out nicely. My mom and her husband are happy with it and that is what is most important to me.

Page 1 2