Welcome

My name is Lisa and I'm a crafty girl with wanderlust working as an engineer by day. My blog chronicles projects in my home as well as pictures and stories from my travels.

Search


Instagram

Blog Index
The journal that this archive was targeting has been deleted. Please update your configuration.
Navigation

Entries in Bathroom (19)

Monday
Feb202012

Organizing My Bathroom Built-in Shelves

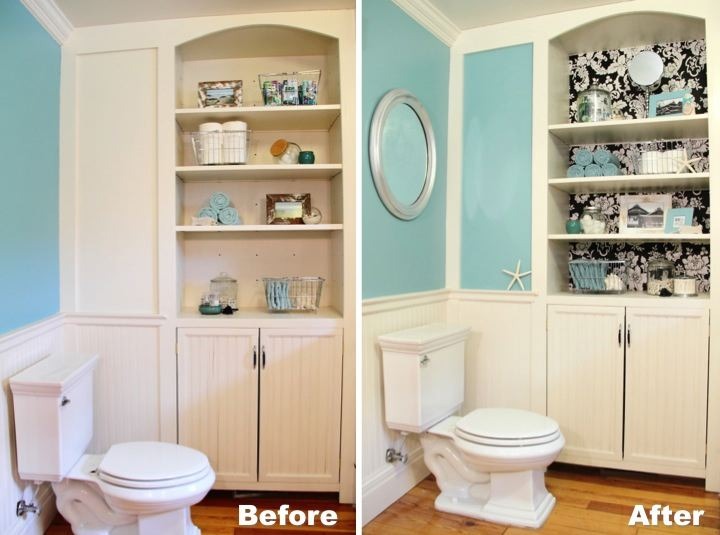
With my many projects (hanging wallpaper and painting the built-in, adding shelves and organizing the built-in cabinet and hanging a mirror on the wall) completed there was only one thing left for me to finish up in this corner of the bathroom; organize the built-in shelves. After all of the more mundane things this was definitely the fun part for me.

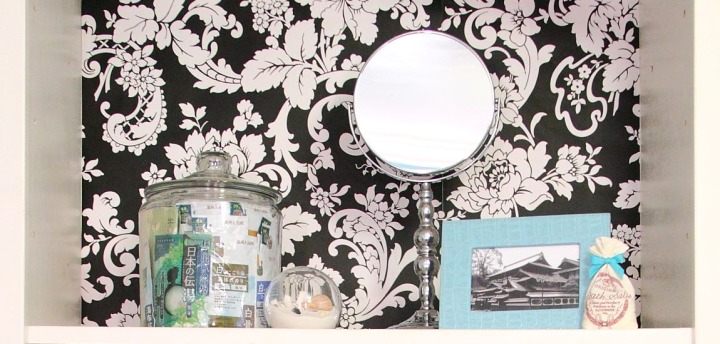
On the left side of my top shelf I have a large glass canister from Target for storing my packets of Japanese bath salts. Previously I had them in a wire basket but they kept slipping out so I got this canister instead and moved the basket to my craft room for storing fabric. Japan has a strong bathing culture and going to hot springs (onsen) for bathing is very popular. When I was living in Japan it was well known among my friends that I loved going to onsen so I got lots of bath salt packets with minerals from different famous onsen for going away presents.

Next to my bath salts I have a glass bubble filled with shells and sand that my sister gave to me for Christmas one year. On the right side I have a photo that I took of Dogo Onsen (one of the oldest hot spring baths in Japan) in a teal faux alligator frame that I picked up on sale at Papyrus years ago. Next to the frame I have a little muslin bag of bath salts that I bought in Bath, England. It originally had a royal blue ribbon on it so I swapped it out for a teal one. My last item on the top shelf is a new standing mirror at I picked up at HomeGoods this past week. I've been wanting to get a mirror like that for a while and decided that as a reward to myself for my bathroom progress I would get it.
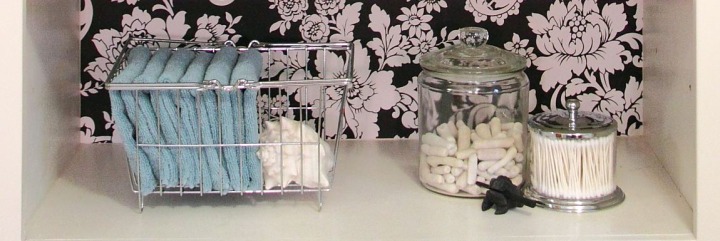
On my second from the top shelf I rolled up my extra hand towels and stacked them up on the left side. The right side has a wire basket from Target with extra rolls of toilet paper in it and a little starfish.

On the left side of my second from the bottom shelf I have an old glass canister whose lid I spray painted silver. I have it filled with cotton balls next to a little teal ceramic jar that was a thrift store find. On the right side I have another photo of Dogo Onsen in a white reclaimed wood frame that I picked up at an art fair on the Mornington Peninsula in Australia. I also printed out an Alicia Keys quote, "If I want to be alone, some place I can write, I can read, I can pray, I can cry, I can do whatever I want - I go to the bathroom,” that I used for a previous blog post and put it in another teal frame that I bought at the same time as the one on the top shelf. Last but not least I have a little fish shaped pumice stone. 

On my bottom shelf I have another wire basket from Target with my extra wash cloths folded up in it. I also tucked in a conch shell that my paternal grandfather gave me years ago when I was a little girl. On the right side I have a glass canister filled with white coral that I picked up on a beach in the USVI when visiting my sister. In a smaller glass and chrome container from HomeGoods I have my cotton swabs and for fun I have a little wooden frog I got on another one of my trips to the Caribbean with my sister. 
It feels so nice to have this part of the bathroom all organized and finished now. Almost all of the items I already had and my only new purchases were the large glass container for my bath salts, the standing mirror and the little container for my cotton swabs. I love that everything on the shelves either has some functional bathroom purpose or has a special memory for me. With just a few small things that I've done, this corner of my bathroom now looks a lot more polished and finished than it did just a month ago. Now if only I could get some motivation to finish up my bathtub...
If you are interested, check out the rest of my bathroom posts here: Bathroom Blog Posts

Saturday
Feb182012

Simple DIY Shower Stool

As I have been working on finishing up projects in my master bathroom as part of my New Year's resolutions I found a few extra items that I wanted to do before I would feel like the bathroom is complete. One of those additions was to make a shower stool for my shower.

I love my 3' x 5' shower and with all that space I thought that having a little spot to sit down would be really nice. After looking around online and at some stores I couldn't find anything that I liked that was also reasonably priced so in the end I decided to make my own.

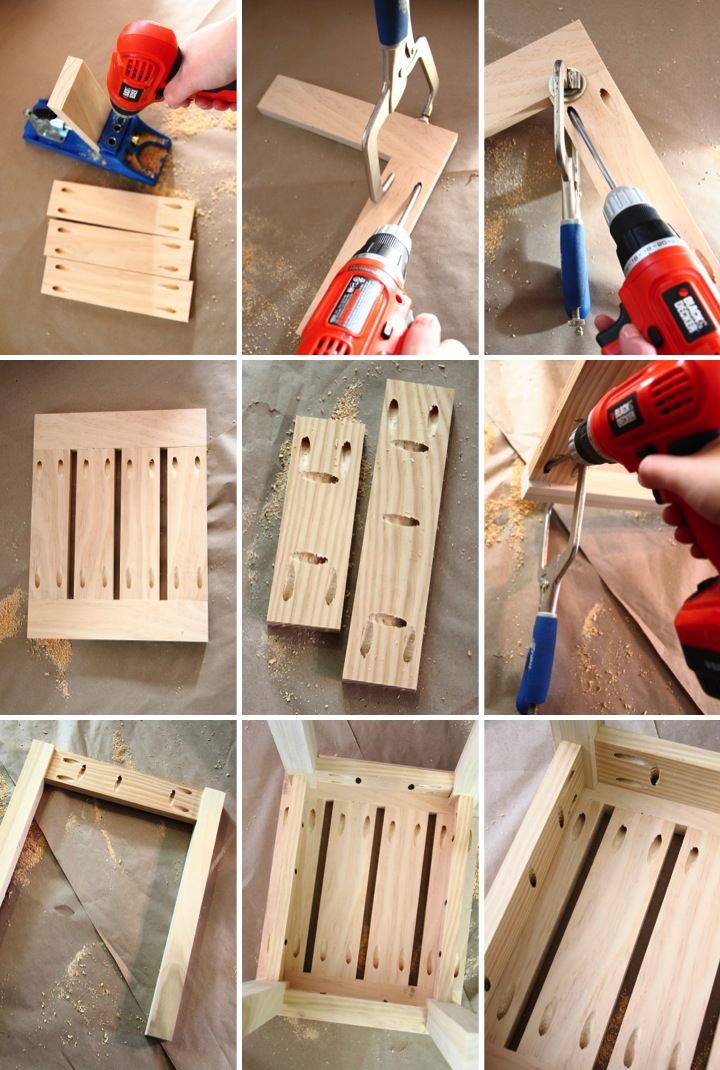
The design is a pretty standard stool design, just made to fit shower dimensions. Completed it stands at 18" tall, 15" wide and 11-1/2" deep. To assemble everything I used pocket holes made with my Kreg Jig which is an awesome tool I learned about on Ana White's amazing and inspiring website. All the pocket holes were under the seat and inside the aprons so I didn't have any holes to patch which was really nice.

It only took about an hour to build the shower stool not including drying time for the spray paint. I already had screws so with the lumber and spray paint I spent less than $20 on the project. I am happy with the results and I think it looks cute in my shower as well as being functional and sturdy. 

Supply List:
2 - 2x2 @ 3 feet long
2 - 1x3 @ 6 feet long
1-1/4" pocket hole screws 

Cut List:
4 - 1x3 @ 10" for seat slats
2 - 1x3 @ 11-1/2" for seat sides
2 - 1x3 @ 11 for front and back aprons
2 - 1x3 @ 7-1/2" for side aprons
4 - 2x2 @ 17-1/4" for legs

Seat Assembly:
To start I drilled 2 pocket holes on each end of the four seat slats. Leaving 1/2" between each slat I clamped and screwed the slats to the sides.

Leg and Apron Assembly:
For each of the aprons I drilled 2 pocket holes on the ends (for attaching to the legs) and then a few more pocket holes along the top edge (for attaching to the seat). Using a scrap piece of 3/8" plywood as a guide, I marked lines on each of the legs  3/8" in from the edge as guidelines for aligning my aprons.

I lined up the front apron to one of the legs, clamped it and then screwed them together. I then attached another leg to the other side of the apron in the same manner. I attached the back apron to the remaining two legs using the same process as the front.

I clamped and screwed the side aprons onto the front legs and finished making the base by then clamping and screwing the back legs to the side aprons.

Finishing Up:
I laid the seat face down and then centered the base on top of it. I used the already drilled pocket holes to screw the seat and base together. 

With all the pocket holes under the seat or inside the apron I just did a light sanding on the piece before finishing it. I used a dark grey spray paint primer on the stool first before applying two light coats of black spray paint.

If you are interested, check out the rest of my bathroom posts here: Bathroom Blog Posts

Thursday
Feb092012

Mirror, Mirror On My Bathroom Wall

In trying to figure out what to hang over my bathroom toilet I stumbled across a gold mirror that I already had. My mom had picked it up used but ended up not having a place for it in her home so she had given it to me about a year ago.

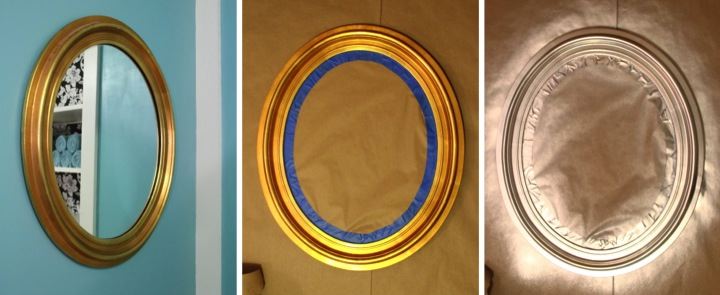
I tried hanging it over the toilet to see how it looked. The shape was great but with chrome and silver in the bathroom the antique gold looked out of place. To fix the situation I turned to my old friend, spray paint.

The mirror was old and there was no way to detach the mirror from the frame without causing damage so I had to cut out some butcher's paper in the shape of the mirror and carefully tape it down with painter's tape to protect it. Because of the oval shape of the mirror getting the painter's tape to curve and completely cover the mirror without overlapping onto the frame was a little tedious. After that I had a new looking mirror with just two thin coats of silver spray paint.

I love how it looks on the wall and I am really happy with the results. Best of all it was free since I already had the mirror as well as the silver spray paint. Now I am one step closer to finishing my bathroom

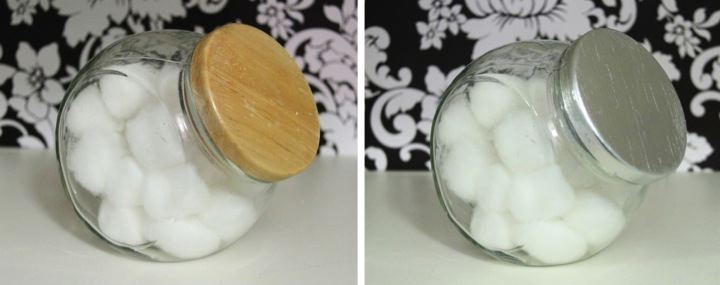
Since I had the silver spray paint out I also decided to update the lid of the canister that I use to store my cotton balls. I've had this canister since I was in undergrad so it was pretty scruffy and worn. Two thin coats of spray paint later and the lid was looking fresh and shiny.

Is anyone else revamping some items they already have? Any spray painting or wall hanging going on in your life?

If you are interested, check out the rest of my bathroom posts here: Bathroom Blog Posts

Tuesday
Feb072012

Adding Shelves to My Built-In

With the top of my built-in gussied up with wallpaper it was time to get to work on making the bottom cabinet more functional by adding shelving. Just like hanging my medicine cabinet, this project also addresses both facets of my 2012 resolutions of getting organized and finishing up projects around the house.

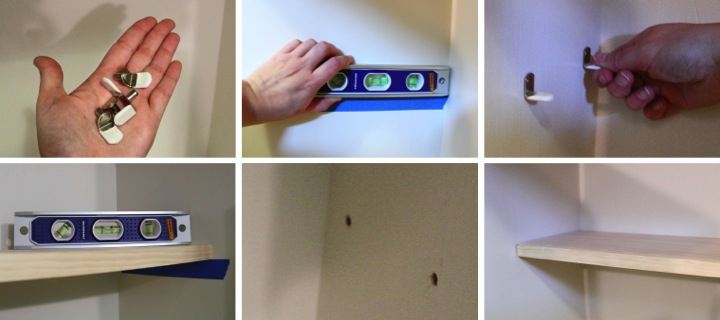
Adding the shelves was pretty easy to do with the only trick making sure to get everything level. I started by picking up a six foot long pine 1x8 board to use for the shelves and some shelf supports from the hardware store. I measured and cut the boards to length and then held them up inside the built-in to get a rough idea of where I wanted them.

I aligned the level where I wanted my shelf to be on the left side of the cabinet and then applied a piece of painters tape directly underneath it which gave me a level guideline. I then measured up the distance from where the board rests to where the peg is located on the supports and drilled holes at that spot 1-1/2" and 6" from the back of the built-in. I put the supports in the holes and then used my level again to check that it was level.

To get the placement for the right side I put one of my shelf boards on the supports that I had installed, put the level on top of it and then adjusted the board until I got it level. I then put another piece of painters tape underneath the board to mark the level line and measured and drilled the holes in the same way that I did for the left side. I put the supports in the holes on the right side and then repeated the whole process for the second shelf.

After priming and adding two coats of paint to the shelves I was all set to start organizing my built-in cabinet. On the top shelf in the left corner I have two cardboard bins that cost a dollar from Target. One has some basic medicines and band-aids while the other has extras of things like razors and soap. Moving across the top shelf I have a little teal dish that I already owned holding my cleaning sponges and then all my bathroom cleaning supplies.

My middle shelf is organized with metal baskets that I also found at Target. The leftmost basket has things that I don't use very often like suntan lotion, bug spray and nail polish remover. The other two baskets hold my sample sized items. Whenever I stay at hotels I always take the mini shampoos, lotions or whatever else may be offered to guests in the bathroom. They are great for packing on my travels or if I have a house guest that forgot something. Over time I had amassed a ridiculous amount of hotel toiletries so I decided to pare things down to just these two baskets with liquid items like shampoo and conditioner in the middle one and dry items like bars of soap and hair brushes in the right one. 

Finally on the bottom shelf I have my extra bath towels and toilet paper. It feels good to have everything organized and by limiting myself to the space available it forced me to go through what I had and throw out a lot of things that I just didn't need. Nail polish that changes color in the sun? Gone. Twenty hotel shower caps? Maybe keeping three is enough. Now I just need to keep everything this way!

Is anyone else out there trying to get organized? How is it going? Do you have any tips to share?

If you are interested, check out the rest of my bathroom posts here: Bathroom Blog Posts

Monday
Feb062012

Hanging My Medicine Cabinet

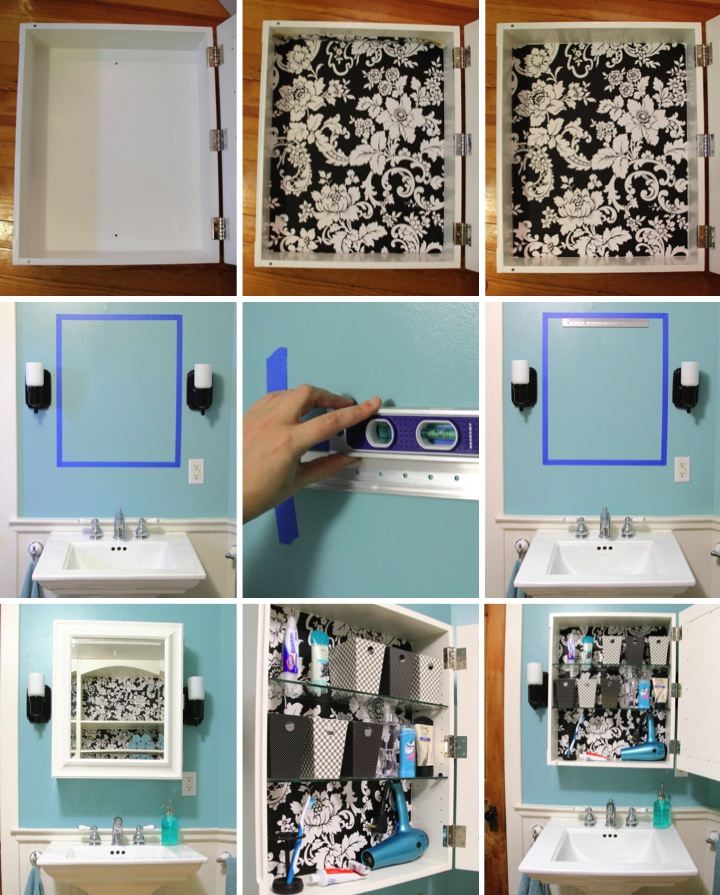
On Sunday afternoon I finally got around to hanging up my medicine cabinet as part of my effort to put the finishing touches on my bathroom. I had considered building my own but then I found this one for half off ($115) at the Birch Run Pottery Barn Outlet and couldn't pass it up.

I wanted to liven it up a bit so I used the same technique that I used for my built-in to add wallpaper to the back of the cabinet before hanging it. To figure out the placement, I put up some blue painters tape on the wall in the dimensions of the cabinet, adjusting it until I got it located where I liked. I then hung it according to the directions, screwing the metal cleat into the wall using wall anchors and making sure it was level. After putting the glass shelves back in I was ready to fill it up.

I don't have much in the way of toiletries so I have plenty of room to keep things neat and tidy. I found cute little black and white cardboard bins for a dollar each at Target (I love the One Spot!) to use as shelf organizers. I have my disposable contacts in one, bobby pins and hair bands in another, earrings in another and so on.

I really like how the medicine cabinet looks compared to the small mirror I had before and now I can keep the deck of my sink clear of everything but my hand soap. It also helps me toward both of my 2012 New Years resolutions of finishing projects around the house and getting organized. Not bad for a project that took me less than an hour to complete!

If you are interested, check out the rest of my bathroom posts here: Bathroom Blog Posts

Wednesday
Feb012012

Resolution Recap: January 2012

With one month now into the New Year I thought that I would take a look back to see where I stand with my 2012 New Year's resolutions.

January was a hectic month for me since I was out of town for almost half of it. On top of that I have been sick for the past two weeks and am just now starting to feel like myself again. Despite those difficulties I am proud of what I did manage to get done and it has me energized and excited to keep going. Hopefully I will be able to  accomplish even more in February just by being in town and being healthy.


Resolution 1: Purge & Organize
For three out of the five Mondays I met my goal of having a volume of at least one trash cart (between my recycling and regular trash) out on the curb on garbage pick-up morning. The other two Mondays I was out of town that day so I'm giving myself a pass. Here's my breakdown:

- January 2: Nothing (In New Orleans)
- January 9: 3/4 full trash + 1/2 full recycle = 1-1/4 total
- January 16: Nothing (In Pasadena
- January 23: 3/4 full trash + overflowing recycle = almost 2 total
- January 30: Full trash + 1/4 full recycle = 1-1/4 total

I even managed to put things out on the ninth when I was only home for the weekend before leaving that Monday afternoon for Las Vegas. I actually barely made it on my flight because I ran home to pull the carts off the curb en route to the airport since I figured my neighbors wouldn't be too thrilled about them sitting out for over a week.

Overall on the weeks I was in town I exceeded my goal and I am happy with my progress. Among the items that I got rid of was a leaky air mattress (I have a guest room so I don't really need it anymore even if I did get around to fixing it), some broken luggage (did I really think I was going to try to patch the torn canvas?) and some scraps from my craft room that were really too small to be useful.

In addition to things that went out on the curb I also managed to go through a lot of my kitchen stuff and sort out items that were still usable but I don't need anymore and filled up a box for a garage sale I plan to have in the spring. On the organizing front I made some progress in getting a few kitchen cabinets in order.

Resolution 2: Finish Up Projects
I decided to start working on finishing up my master bathroom since it was almost done making it an easy first step. I am about a third of the way through what I wanted to accomplish. Here's my status:

- Paint the outside of the tub teal (it is currently a light creamy yellow): Prepared area, started stripping old paint
- Replace the cheap, temporary mirror with a medicine cabinet: Removed mirror, measured and marked out wall location
- Add shelving to the inside of the built-in cabinet: Wood purchased
Jazz up the built-in with some color: Done! (Added wallpaper and painted)
- Make a wood vent cover to go over the ceiling fan (the plastic cover that came with the fan just doesn't fit in with the vintage look of the bathroom): Wood purchased
Make a rug to go in front of the bathtub: Done!
- Add some wall art and do some paint touch-ups: Teal touch-ups done

As I got going I decided that I also want to add making a shower stool to my bathroom to-do list. So far I sketched up the design for that and bought the wood and paint for it. My plan is to have the bathroom finished and move on to some other projects in February.

So there's where I stand with my resolutions at the end of January. So far, so good and I hope to hit my stride this upcoming month. Does anyone else out there have any resolutions they are trying to keep? What are your goals for the year and how is it going? I'd love to hear what other people are doing to stay motivated!

Sunday
Jan292012

Sprucing Up the Bathroom Built-in


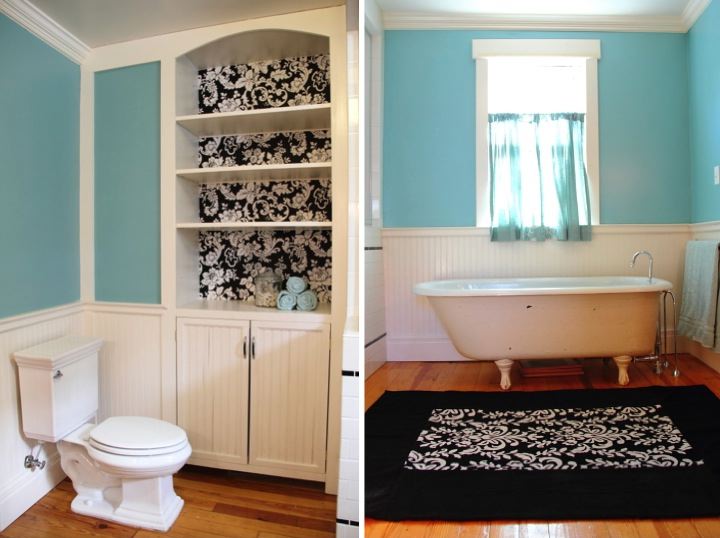
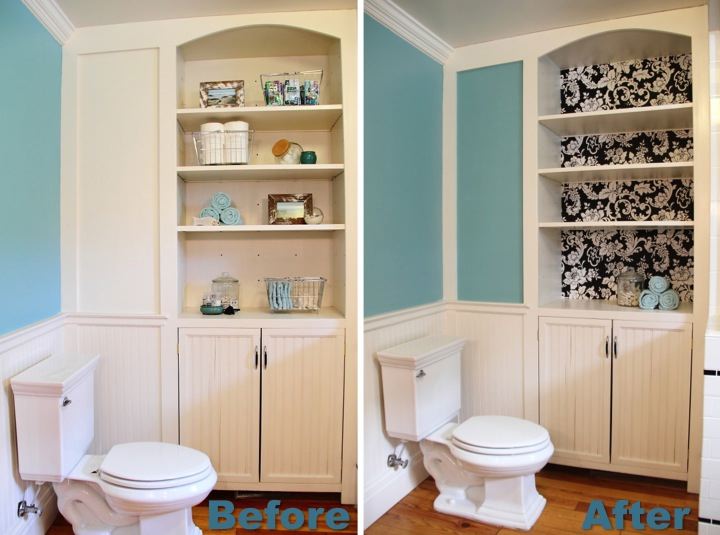
I love this built-in, but as part of finishing up my master bathroom I wanted to spruce it up a little bit. It was all white and just seemed too white to me. Inspired by the black and white damask towel that I turned into a rug for the bathroom, I thought that some black and white damask wallpaper might do the trick.

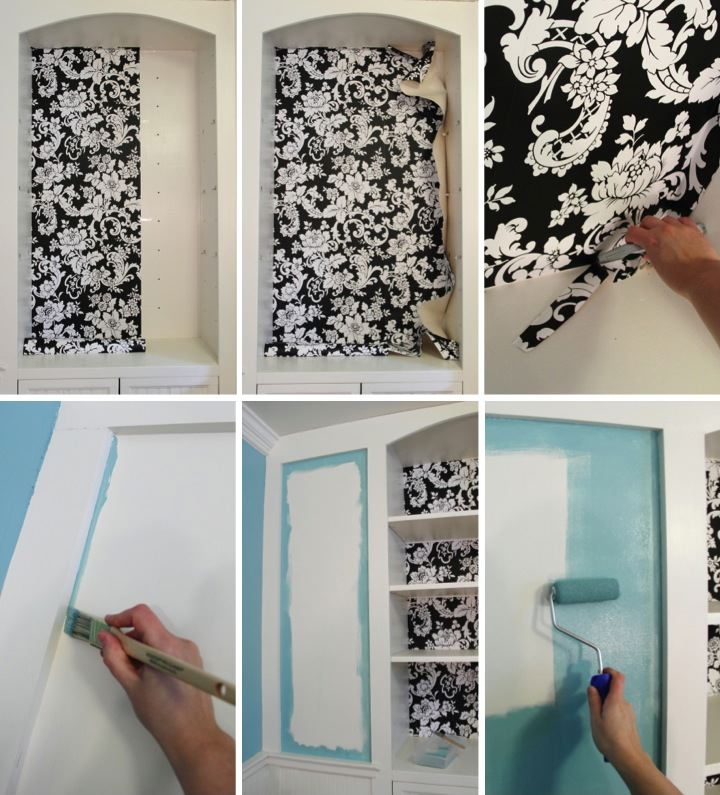
I didn't want to do anything permanent since I wasn't sure if I would like it or not so instead of applying the wallpaper using the paste on the back I decided to use double sided tape. I ran a strip of tape right along the perimeter of the back, across the place where the seam would be and then in various spots around the middle of the built-in. After that I hung the first piece of wallpaper, with extra along the top and bottom, smoothing it down against the double sided tape. I then hung the second piece the same way, lining up the pattern along the seam. After both pieces were secured, I ran a razor blade around the edges to trim off the excess paper. On the second piece there was so much overhang that I ended up cutting it to an inch to get rid of the bulk before doing the exact trim with the razor blade.

I'm not sure how well it will hold long term, but the double sided tape seems to be doing the trick and will at least give me some time to decide if I want to make it permanent.

After paper the back of the built-in shelves I wanted to paint the part that boxes in the old chimney to match the rest of the walls in the bathroom. Luckily I had some of the paint saved and it was in good shape still. Typically I like to cut in my edges by hand since I have a pretty steady hand and it saves time instead of taping. After two coats of paint with a small foam roller I was all done. Since I had the paint out I also did some minor paint touch ups around the rest of the bathroom that I had been putting off. 

So far I think it is a big improvement and I like the way that it looks. Now I get to have some fun figuring out what to put on my shelves!

 
If you are interested, check out the rest of my bathroom posts here: Bathroom Blog Posts

Saturday
Jan282012

Making a Bathroom Rug from Towels

This weekend I decided that I needed to get cracking on my long list of items to finish up my bathroom. Since I still had black thread on my sewing machine from making my laptop sleeve, I thought making my bathroom rug would be the perfect place to start.

I have some black in my bathroom with the liner bar tile in my shower and the black ceramic light fixtures so when I stumbled upon a solitary black and white damask towel at HomeGoods I thought it would be perfect for turning into a rug for my bathroom. It was a bit smaller than I wanted, though so I decided to add a black border with two black towels that I picked up from Target. I had priced out buying black terry cloth from a fabric store but buying the bath towels instead turned out to be cheaper.

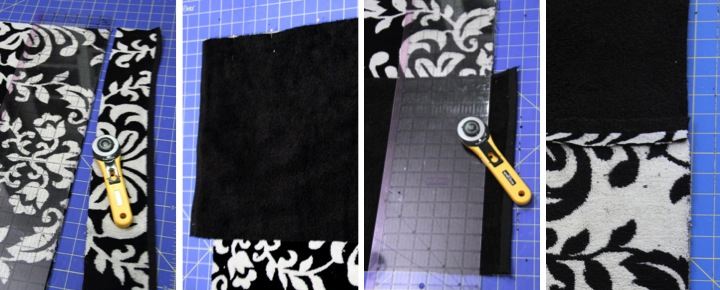
To start, I trimmed off the binding on the damask towel with my rotary cutter.  The towel was a little puckered on the end so I made sure to trim that part off as well so I was left with a flat rectangle with straight edges. I then cut each of the black towels into two 14" long strips.

I took one of the black strips and pinned it, with the right sides together, to one of the long sides of the damask towel. After stitching the pieces together I pressed the seam flat and repeated the same steps on the other side of the damask towel with another strip of black. I decided on using a 5/8" seam since the material was so bulky.

With the two sides sewn on, I trimmed off the excess black towel so it was even with the damask towel on both ends. On each of the ends I attached another piece of black towel like mentioned above and then trimmed the ends so I was left with a large black rectangle framing the damask pattern. To finish the edges I simply turned the salvage under and sewed it in place with a seam 1/4" from the edge.

I like how the rug turned out and since it is made from towels it is soft under my feet and I can simply throw it in the wash to clean it. It was also great for my budget costly only about $12 to make. Now I need to tackle a few more projects... 

If you are interested, check out how my master bathroom renovation finally turned out: Master Bathroom Renovation Recap

Friday
Jan132012

Plans for my Master Bathroom

As part of my New Year's resolution to get projects finished up at my house I thought that I would tackle my master bathroom first since there isn't too much to do and it would be an easy first step.

When I first moved in, the room where my bathroom is seemed to have been used as a kitchen at some point since there were some remnants of plumbing sticking out of the wall and some remnants of tea kettle wallpaper. It was a great, nice sized space (10' x 10') with hardwood floors but there were no outlets and the horsehair plaster was crumbling off the walls and ceiling. The room is adjacent to the two tiny rooms that I combined to make my master bedroom so I decided to make it into my master bathroom.

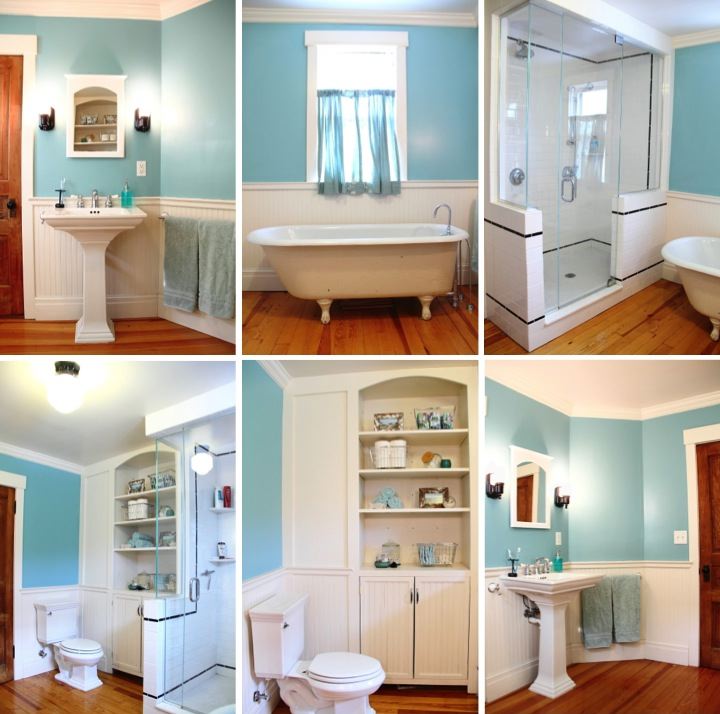
The room required a complete renovation, tearing everything down to the studs, adding all new electrical, plumbing, and HVAC and refinishing the floors. I moved in the cast iron tub from the tiny upstairs bathroom and built a 3' x 5' walk in shower that I tiled with subway tile for a period look in keeping with my house. The built-in provides a nice storage space and also makes good use of the niche left after the chimney was boxed in. Having the built-in also allowed me to use a pedestal sink instead of having a vanity which I liked for having an open look in the bathroom. The lighting fixtures are vintage reproductions and I bought the antique glass shade for the overhead light on eBay. I wanted the bathroom to be be bright and cheery so I painted the room a fun teal color. One of my favorite parts about the bathroom is the wainscoting that goes around the room which I think adds a lot of charm. The pictures below show how my bathroom is currently, starting with the sink and going counter-clockwise around the room.

While I love how things have turned out in my master bathroom, I have a ton of small projects to finish up before I will feel like it is complete. Here's my current to-do list:

- Paint the outside of the tub teal (it is currently a light creamy yellow)
- Replace the cheap, temporary mirror with a medicine cabinet
- Add shelving to the inside of the built-in cabinet
- Jazz up the built-in with some color
- Make a wood vent cover to go over the ceiling fan (the plastic cover that came with the fan just doesn't fit in with the vintage look of the bathroom) 
- Make a rug to go in front of the bathtub
- Add some wall art and do some paint touch-ups

I'm still out of town right now, but I'm looking forward to start tackling some of these projects when I get home. 

Page 1 2