Welcome

My name is Lisa and I'm a crafty girl with wanderlust working as an engineer by day. My blog chronicles projects in my home as well as pictures and stories from my travels.

Search


Instagram

Blog Index
The journal that this archive was targeting has been deleted. Please update your configuration.
Navigation
Wednesday
Oct312012

Halloween in Japan (With a Hello Kitty Piñata Tutorial, Of Course)

Halloween is such a part of American culture it seemed hard to let it pass unnoticed while I was living in Japan. Another one of the American expats, who was from Arizona, was keen to host a Halloween party at his place and thought a piñata would be a perfect addition. Actually, he really just wanted an excuse to have a piñata and Halloween fit the bill since candy was involved.

He had looked online to see if there was any way to get piñata sent to Japan. When he came up with no leads, he asked me if I knew how to make one knowing I was crafty. I had never done it before but I always like trying new things so I agreed to help out.

Since we were in Japan we quickly settled on Hello Kitty as our piñata subject. To make the form we used two large balloon with the pointed ends tilted out for the ears. To fill in the space and make the head oval we blew up a little balloon and placed it in between the ears using a little bit of tape to hold the balloons together.

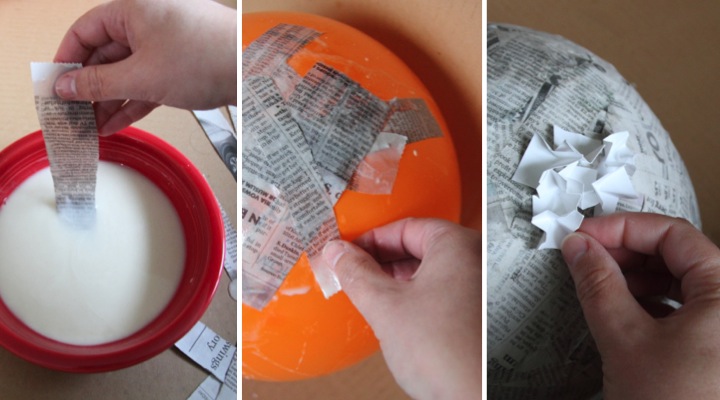
Next we paper-mached the balloons. We made paper mache paste mixing together 1 part flour to 2 parts water. We cut up pieces of newspaper into 1" strips, dipped  them into into the paste and layered them over the balloons. In order to get a strong piñata we made sure to cross the strips and put on several layers.

Once the paper mache was dry we popped the balloons, cut a hole in the bottom, filled it with candy and taped the flap back shut. Finally it was time to decorate. We cut up squares of white paper, crinkled them, put a dab of glue on the back of the middle and pressed them onto the form. I used some black duct tape to make eyes and whiskers and an oval of yellow paper for the nose. With a red bow from the Hyaku-en Store the Hello Kitty piñata was complete and ready for the party. If you want to make your own piñata just arrange balloons into the form you want and then follow the rest of my instructions.
My friend lived in an American style apartment complex that had a courtyard and he figured out a way to string up the piñata between two of the buildings and a small tree. I apologize for the crappy pictures but it was nighttime and even I am not so dorky that I would bring a tripod to a party.

The piñata was a big hit (haha, I am punny!) at the party. We had made it a good strength and it took 18 people before it was finally brought down. Most of the people in attendance were not Americans (a mix of Japanese, Europeans and Australians) and so they didn't get the whole "rush to gather the candy after the piñata breaks" part of the tradition. I, of course, love candy so I was gathering it up by myself while everyone else looked on like I was crazy. More for me, right? Well, actually I figured that I had an unfair advantage since this was not my first piñata so I passed the candy around.
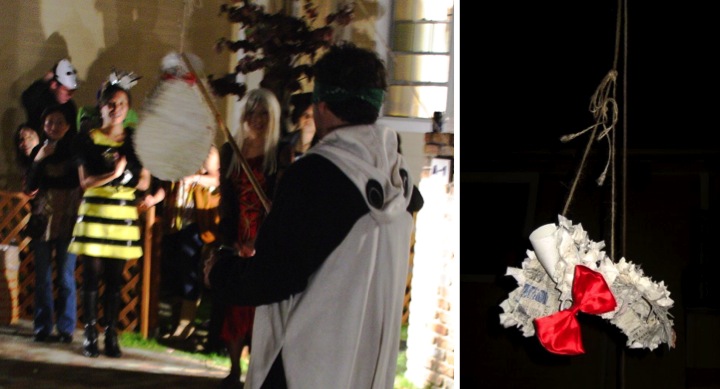
All in all it was a really great night and the piñata was a fun, non-traditional addition to the Halloween evening.  

Wednesday
Oct312012

Picture of the Day: Blankets for Sale in Playa del Carmen


Playa del Carmen, Mexico
10.08.2005

Tuesday
Oct302012

DIY Crown Molding Closet Shoe Organizer for Heels

I am short but I would just love, love, love to be tall. Because of this I have a high heel addiction and wear them everyday. In fact, I am so used to wearing heels that I can run in them as fast as I can in flats. Before you are impressed, I must disclose that I am painfully slow in whatever footwear I choose. I would tell you to think tortoise slow, but that would be slander against the tortoise.

Anyway, I digress. The point of all of this is that I have a lot of heels. I also happen to live in a house that is over hundred years old built in a time when thoughts of master suites with shoe closets were not exactly on the radar. As a result I need to make the best use of the closet space that I have to store my shoe collection. 

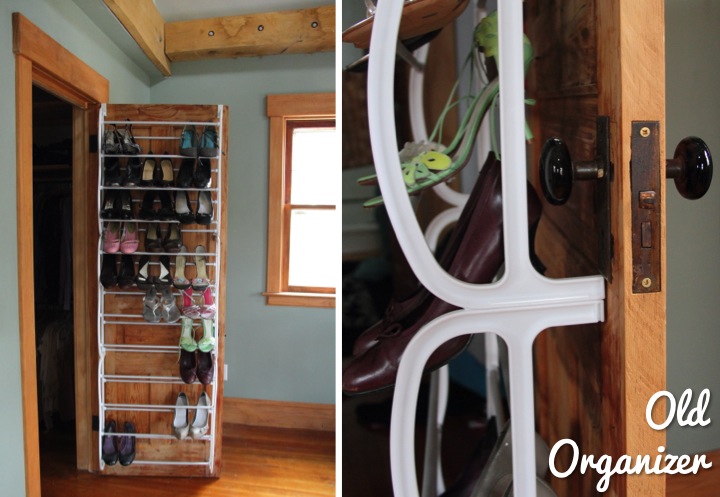
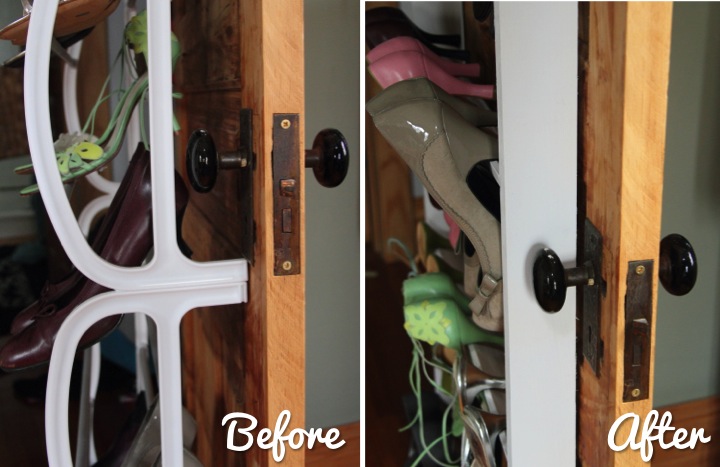
My old solution was terrible. It was a cheap over the door organizer that had all sorts of problems. First, it stuck pretty far out from the door making it a little unwieldy to get in and out of the closet. Second, it was just flat out ugly made from cheap plastic with metal rods. It doesn't look so bad in my pictures, but it real life it was an eyesore. Third, and most importantly it covered over the inside door handle. Normally, no one would care about an inside closet handle but when I remodeled the second floor of my house I reconfigured it to expand the closet as much as I could and to make it a pass through into the master bathroom. If I want to go from the bathroom to my room I have to wrangle the door knob through my shoe organizer. It's really annoying so I tend to just leave the door open which is not the best solution. 

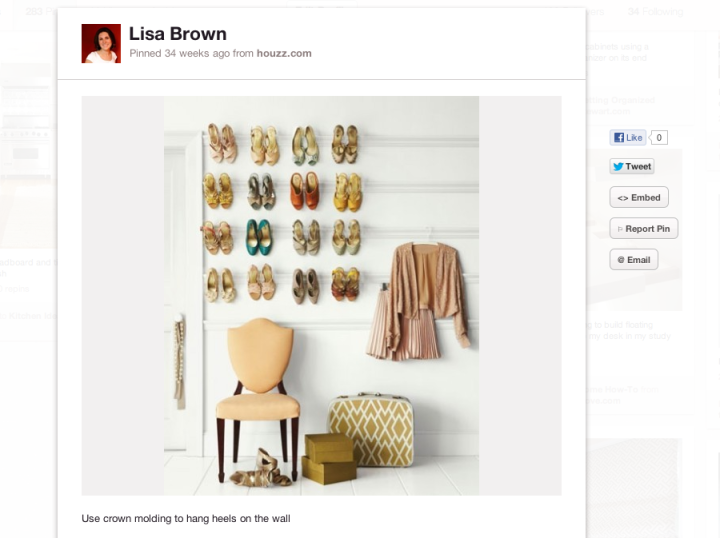
Several months ago on Pinterest I pinned an image of crown molding on a wall for hanging heels from an article on Houzz.com thinking it would make a great solution for me. It has languished among my many pins, but I decided to use The Pinterest Challenge hosted by SherryKatie, Carmel and Sarah to finally get around to doing something with the idea.

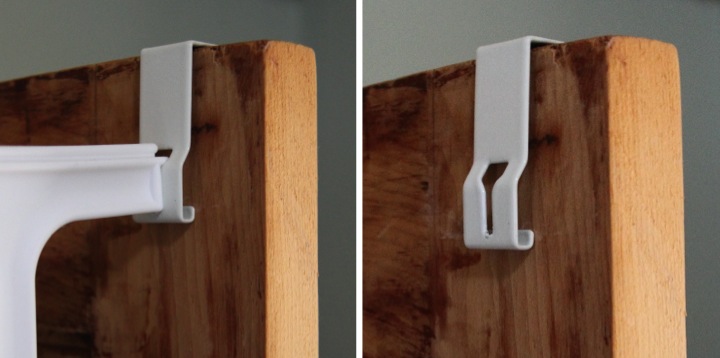
Unlike the pinned image, I wanted to keep my heels inside my closet instead of displaying them on the wall. Also, I didn't want to make any holes in my old solid hardwood door (yes, I know it is bad need of refinishing). On my other closet door I had previously made a laundry sorter system from hanging baskets and had used Command Hooks so that I wouldn't damage the door. Command Hooks wouldn't be an option for this project, however, since any shoe organizer would be too heavy for them. As I was taking down my old shoe organizer, I realized that the metal part that went over the door could be slipped off the rest of the organizer and would make the perfect solution for me.

With how to hang up the shoe organizer figured out I next had to tackle the frame. I needed to make it as light as possible so it wouldn't put excessive stress on the door hinges. After sketching some ideas I decided to use 1x3s for sides with a 1x4 brace at the top. I measured a few pairs of my heels and determined that spacing the crown molding shelves 12" would allow me sufficient space for things not to be too crowded and give me six shelves. I was also careful to determine the width (22-1/2") so I wouldn't have interference with my door knob.

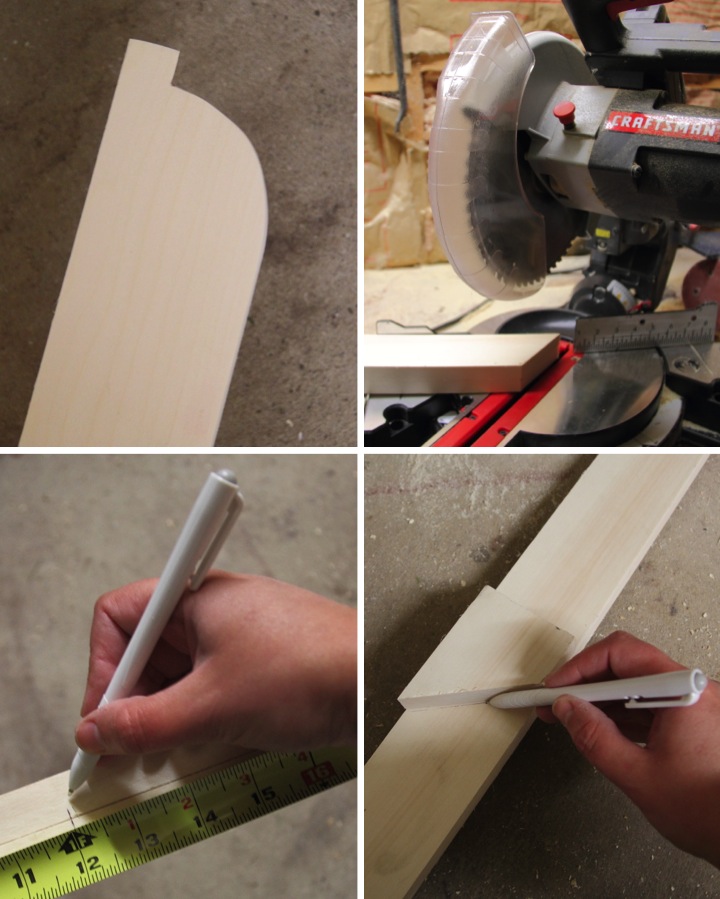
I didn't want to have the top have a square sharp edge so I traced a design on the top of my side supports and cut it out with my jigsaw. Next, I held up the crown molding against the side rotating it until I determined what angle I wanted it to be, which ended up being 40 degrees. I measured down 66" inches from the top (12" x 5 for the spacing between the six shelves plus an extra 6" at the top), clamped the two sides together and cut the bottom at 40 degrees. I then made a mark every 12" starting from the bottom and used the trimmed off piece as a guide to mark the angle for the molding on the sides.

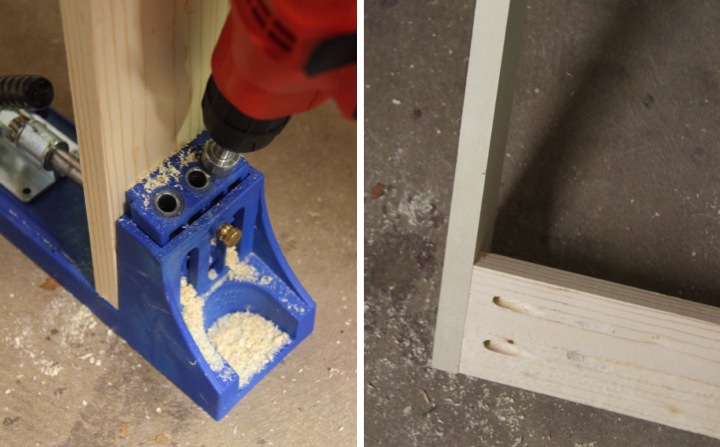
With my sides cut and marked, I cut the 1x4 brace and five of the shelves at 21" and an additional shelf for the bottom at 22-1/2". I made the bottom shelf the full width because I planned it to go over the supports instead of inside like the others. I wanted the brace to be well secured to the shelf so I decided to use my Kreg Jig to make pocket holes to attach it to the sides.

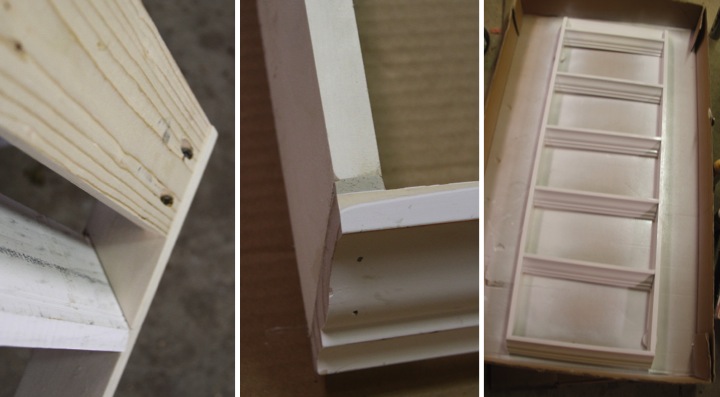
To attach the crown molding shelves I put some wood glue on the ends, aligned them with the marks that I made and used some brad nails to secure them. For the bottom shelf I used glue and brad nails, but placed it on top of the angled bottom. This left a little gap which I filled in with wood putty and sanded flat.

I filled in the rest of the brad nail holes, sanded the whole piece, wiped it down with a tack cloth and I was ready for paint. I kept things simple and just gave the organizer two light coats of white spray paint.

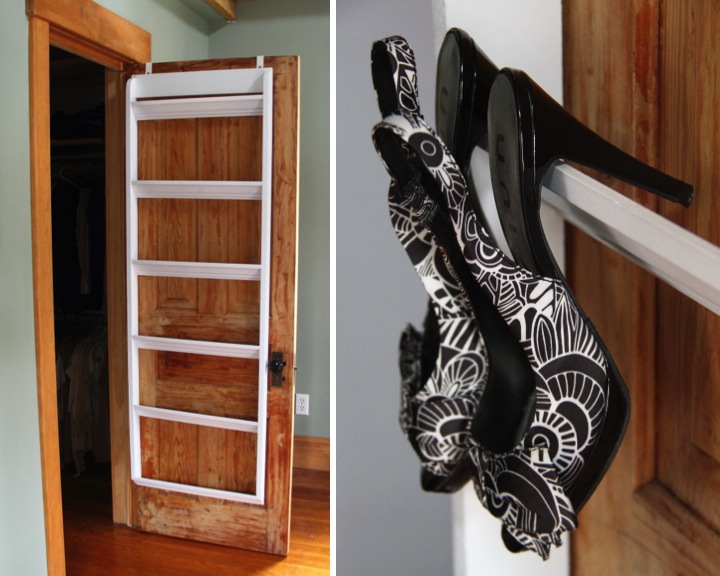
Once the organizer was dry my last step was to attach the old metal over the shelf brackets. I drilled a pilot hole for the screw, attached the brackets with 1/2" screws and my organizer was complete.


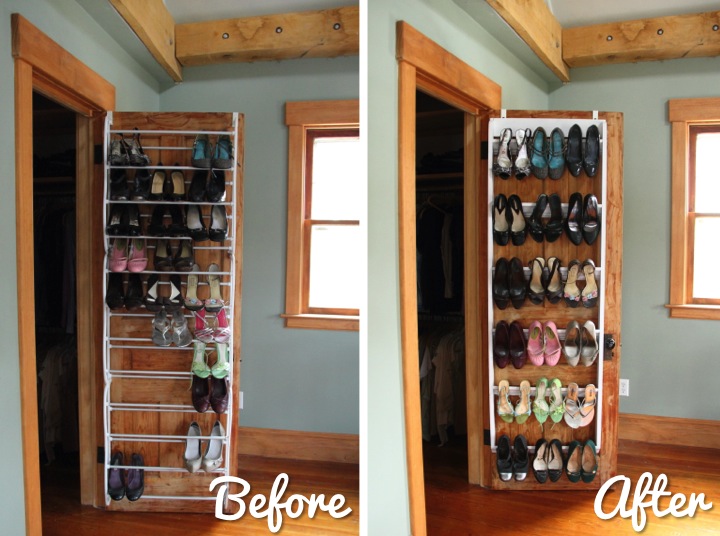
I am thrilled with how my shoe organizer turned out. Not only is it much more functional than my old organizer (I can reach the door handle!) but it is so much prettier. 

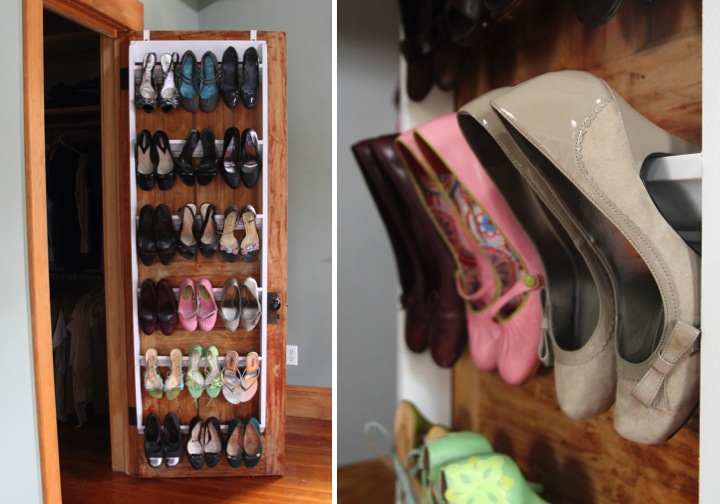
Here is a view of the old organizer and new organizer from afar. I think it looks much cleaner to have the shoes spaced out, plus my newly built organizer sticks out less than half the amount from the door as the old one making it much easier to get in about out of the closet. Also, it is needless to say that crown molding looks prettier than cheap metal tubes any day. 

Did you make anything for the Pinterest Challenge? If so, leave a link in my comments because I would love to check it out!

Monday
Oct292012

Picture of the Day: Beijing Opera Actor Putting on Makeup

Beijing, China
11.2008

Sunday
Oct282012

Mini Pumpkin Wall Art for Fall

After making my sweater vase I thought I would create some wall art to continue with my Autumn decorating in my living room. I wanted something that would work for both Halloween and Thanksgiving and figured that mini pumpkins would be a perfect fit.

I came up with the idea of mounting the pumpkins in a little three by three grid and headed to Lowes to figure out a good idea of something to serve as a mounting board. I toyed with the idea of planking together some boards, but when I saw that I could get a 1/2" thick 2' x 2' oak plywood panel for $8.50 I was sold on that solution. I picked out the panel with the prettiest grain and picked up some white mini pumpkins on my way home.

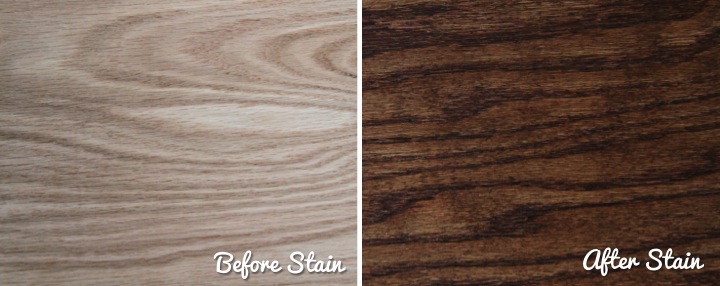
With supplies in hand I started by staining the plywood with Watco Danish Oil in Dark Walnut. I like using it because it is really easy and you can't really screw it up. That's my kind of staining! After you prep your surface by sanding and wiping it down, you simply flood it with the Danish Oil and use a rag to spread it around until the whole surface is covered. After letting it penetrate for half an hour you apply the Danish Oil in the same way again. Fifteen minutes later you wipe off the excess and your piece is ready to use eight hours later. Here is my plywood before and after I stained it:

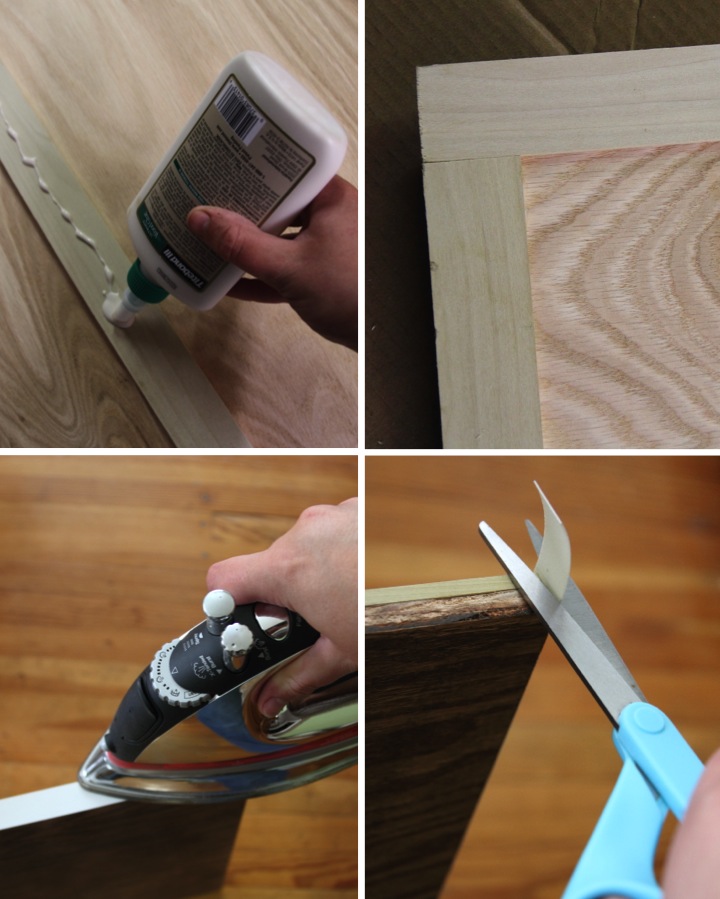
Since I was using plywood I had to figure out a way to cover the rough edges. I decided using some white iron-on melamine banding would be fun and help set it off from the wall. The edging I had was 3/4" thick and I thought it would look neat if the board seemed thicker so I took some scraps that were 1/4" thick and used wood glue to attach them around the perimeter on the back. After that I simply cut the lengths of the banding that I needed and ironed it onto the edge.

Next up I tackled the mini pumpkins. I had purchased white ones, but they are really cream colored and I thought a true white look would be better for my project, especially since I had used the white band for the plywood. That was an easy fix with a can of white spray paint. With two light coats of matte white I think the pumpkins almost look like little ceramic sculptures.

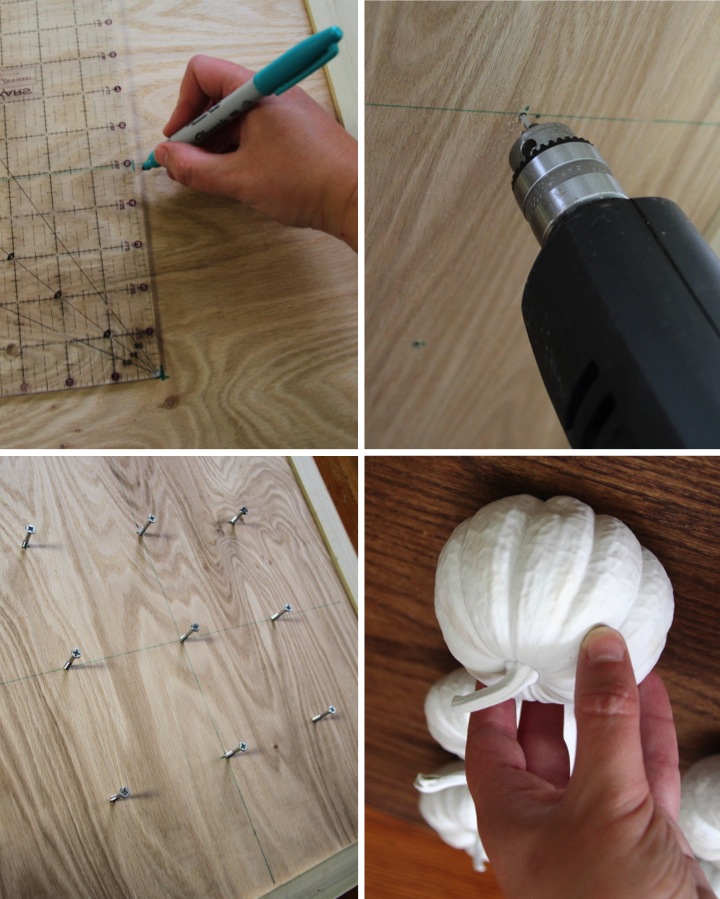
Once everything was dry I was ready to start assembling. On the back of the board I marked the center and then marked the remaining eight locations for pumpkins in a grid with 5" spacing. I drilled pilot holes at each of the locations and then started 2" screws in each hole. To mount the pumpkins I held them over the pilot hole in the front and the drilled the screw from behind the plywood into the pumpkin.

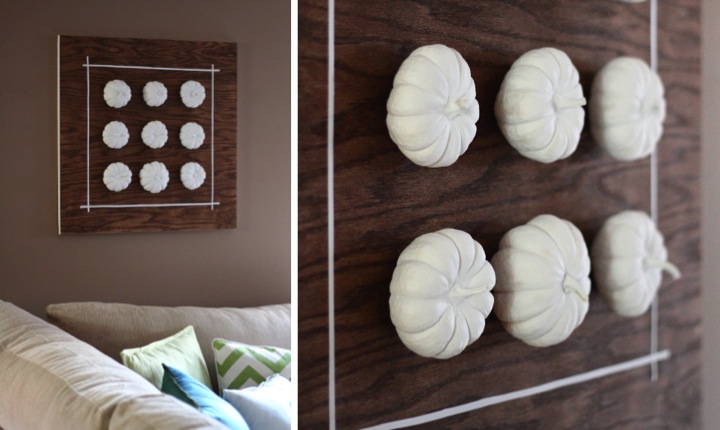
With the pumpkins mounted I thought it looked really cute but needed a little finishing touch. I took some scraps of white vinyl contact paper cut it into 1/4" wide strips and made a border around the pumpkins.

I think my mini pumpkin wall art turned out really cute. It is festive, but the neutral color scheme doesn't clash with the colors in my living room.

Are you doing any decorating for fall? Have you ever spray painted pumpkins?

P.S. If you are interested, I've gathered together a gallery of my autumn related posts: Gallery of Fall Posts & Projects

Sunday
Oct282012

Picture of the Day: St. Paul's Cathedral in Autumn


London, United Kingdom
11.21.2003

Saturday
Oct272012

New Dining Room Table

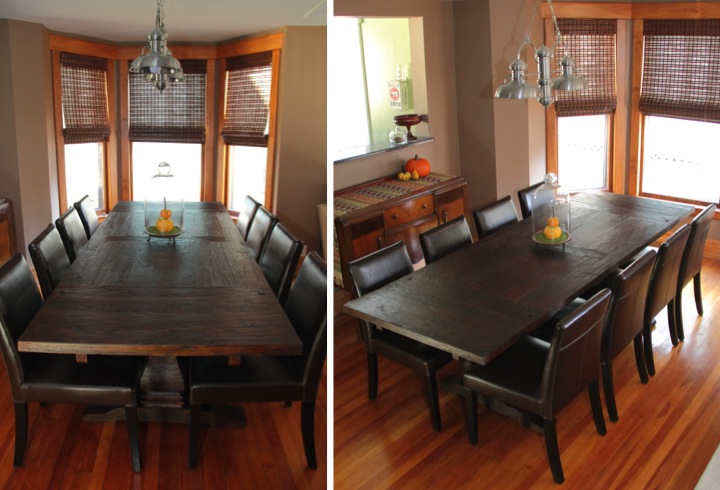
Just a few short months ago my dining room had a $10 laminate table that I had picked up from the ReUse Center and some Ikea folding chairs. Not exactly classy, but it got the job done. 

In June I upgraded my chairs when I found an awesome deal on Craig's List for a set of eight Lowe Chocolate Leather Side Chairs from Crate and Barrel for $500. They were beautiful, super comfortable and such a great deal (normally $199 each) that I couldn't pass them up. After that my dining room looked like this:

I was ecstatic about the chairs but it made my table seem even worse. The table is laminate with some white paint spatters on top that required me to always keep it covered. On top of that, the table legs kept me from pushing the chairs at the head of the table in and even then, only six out of the eight chairs fit around it.

The last straw indicating that my junky old table needed to go was when I bought Super Couch. I have an open floor plan on my first floor so my dining room and living room are one big open space. Super Couch encroached into the dining space a little more than my old couch so I needed a table that wasn't as wide so people could still get around the table comfortably. Here is a picture of the sectional right after I bought it where you can see the dining area behind it a bit.

Being the logical engineer that I am, I had been thinking about the criteria I wanted in a table ever since I bought my new chairs back in June. I definitely wanted something that could seat eight people. I was also leaning toward getting a trestle table so I didn't have to worry about the legs limiting the chair locations. I also wanted something a bit narrower so that with the table centered under the dining room light (which is aligned with the bay windows) I would have three feet between the table and the sectional. My remaining item on my wish list was that the table would have leaves. I like to set up my Christmas tree in the bay window so having the flexibility to be able to make the table a little smaller to accommodate the tree is important to me.

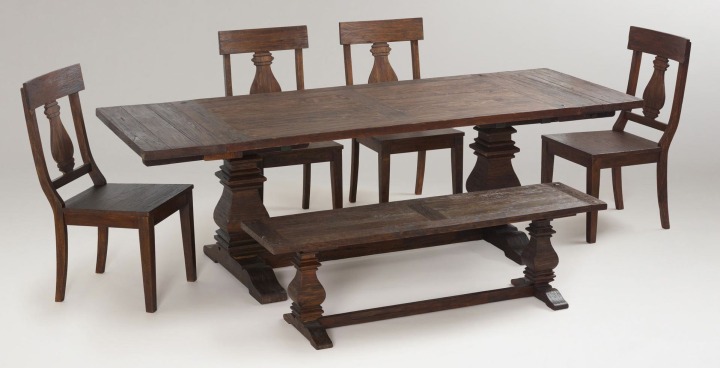
I did some searching around and found a table that fit the bill perfectly. The Arcadia Extension Table at Cost Plus World Market was a trestle table (check!) and narrower than my old table at 36" wide (check!). It also had two leaves (check!) and extended to 96" to fit eight people (check!).

Being a cheapskate I had to think about it a while since it was $699. Last week I got a 25% coupon for furniture by email from Cost Plus World Market (making the table $525) so I decided that I couldn't pass the deal up and it was time to finally get it.

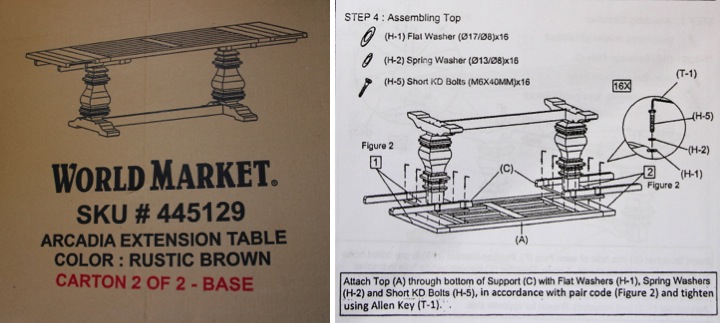
Frank helped me pick up the table (it wouldn't fit in my little hatchback) but with work being busy I didn't have time to set it up until last night. Frank is out of town, but being the stubborn person that I am I set it up by myself ignoring the instruction's warnings that it is a two person job. Luckily I'm pretty strong for a short girl and I managed to get it done. The only thing I had to do differently from the instructions was that after I built the base I put the top on and attached the bolts from under the table since I assessed the situation first and knew that building it upside down and flipping it over was not an option for me by myself.

In the past I have gotten into some scrapes by mistaking my determination for actual strength and ability which leads me to try to do things alone that I really shouldn't. Case in point: attempting to move a piece of 5/8" thick 4' x 8' sub-flooring into place over some joists by myself resulting in slipping and falling through the joists catching myself under the arm. I wasn't badly hurt but I had a huge red line running across my shoulder through my armpit and was a little sore for a while. Not my finest moment, but since then I've tried to be better about asking for help when I need it, although it is still hard for me since in my mind I am as tough as a 6' tall construction worker.

With the table built I couldn't wait to get the chairs around it to see how it looked together. I feel like a real adult now that I have proper dining table and chairs. The paint splattered laminate table has served me well, but there is something nice about a solid wood table.

I took some pictures this afternoon of the final arrangement. I have trouble taking pictures of the dining room because the bay windows and the pass through from the kitchen wash out everything near them and make the rest of the room look dark. It looks so much nicer in person.

I really like the contrast between the clean, tailored look of the leather parsons chairs and the rustic look of the table. I couldn't be happier about the table and it was worth the wait to get exactly what I wanted. I just need to make up an excuse to have a dinner party now...

From this angle it looks a little crowded but I actually have over three feet between the table and the sectional, just like I wanted.

Still on my to-do list in the dining room is to paint the trim white, maybe change the wall color, replace the free standing buffet with and a built-in and add a little artwork. It is definitely starting to come along, though!

What do you think about the new table? Have you made any fun furniture purchases lately? Did you wait until you were 35 to buy a proper dining table like me because you are a cheapskate? Have you ever accidentally injured yourself during a home improvement project? Do you have any suggestions about how to photograph a room with a window causing lighting issues?

P.S. If you are interested, check out some of my other dining room posts here: New Dining Room Chairs, Bamboo Blinds for my Dining Room, Dining Room Bookshelf Souvenir Collection and Dining Room Then & Now

Saturday
Oct272012

Picture of the Day: Prague Rooflines


Prague, Czech Republic
6.02.2012 

Friday
Oct262012

DIY Sweater Vase

I've been wanting to do a little fall decorating in my living room but since it is neutral color scheme with light green and teal accents I was a little stumped about what to do until I thought of making this little sweater vase. Since it is definitely sweater weather around here in Michigan it has a fall vibe even though I used a turquoise sweater to match the room.

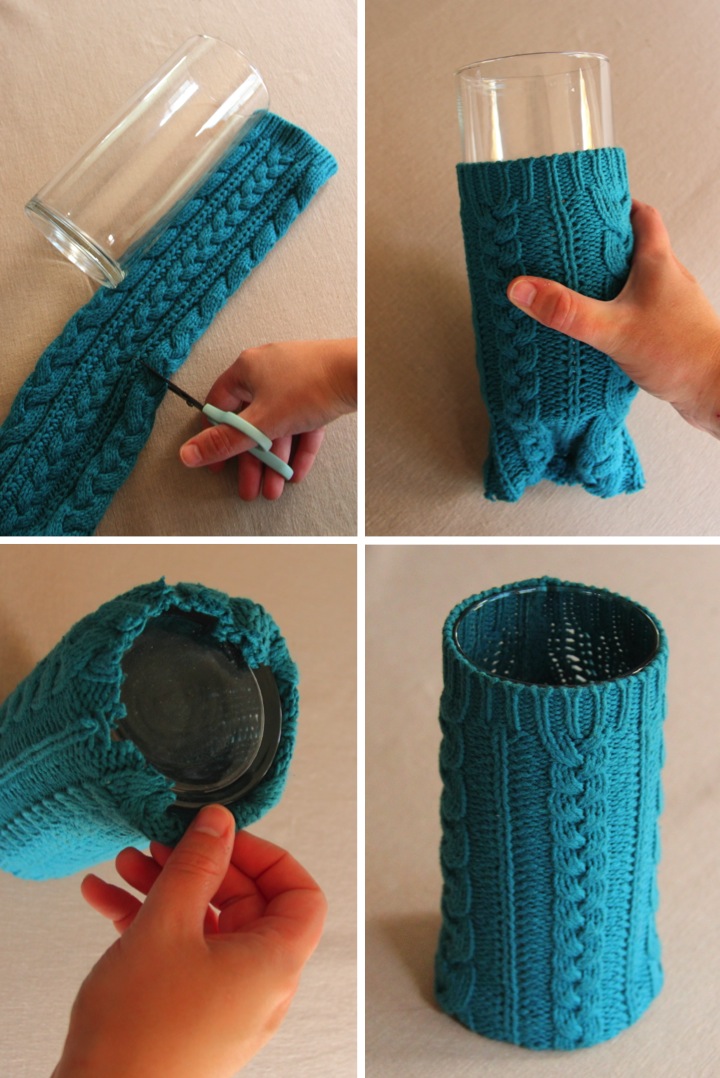
Making the vase is super simple and doesn't require much time or energy. All you need for supplies is a round vase and a sweater you don't mind cutting up. My vase is a dollar store find and I picked up the sweater at a thrift store. The only thing that you need to be careful about is to make sure that the sleeves of the sweater will slip over the vase snugly and not be too loose.

To make the vase I trimmed one of the sweater sleeves about an inch longer than the glass vase. I then slipped it over the vase aligning the cuff with the top of the vase. To finish it off I tucked the extra edges under along the bottom. Super easy-peasy!

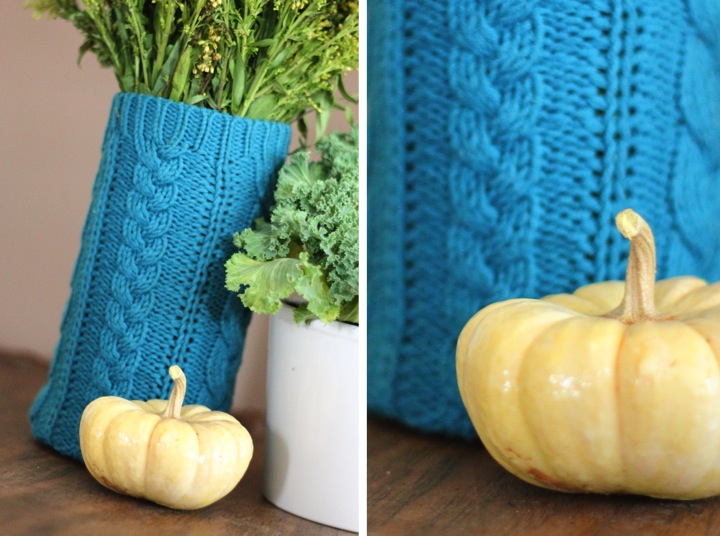
I decided to place some solidago in the vase since it has a lime green color and seemed to evoke fall to me. I paired the sweater vase with a small ornamental kale in a white Ikea pot and a tiny cream colored pumpkin. I think it looks really cute together and is quite seasonal without using traditional autumn colors.

The other thing that I really like about this little sweater vase is that I can easily use this in the winter, perhaps by putting some holly branches or evergreens in the vase and swapping out the pumpkin for a glass ornament.

Are you doing any fall decorating? What seasonal items do you have in your home?

P.S. If you are interested, I've gathered together a gallery of my autumn related posts: Gallery of Fall Posts & Projects

Friday
Oct262012

Picture of the Day: Crowds Surrounding Trevi Fountain

Rome, Italy
3.25.2012