Picture of the Day: Woman Making a Purse at the Straw Market
Nassau, Bahamas
1.2011
 Monday, February 4, 2013 at 7:22AM | Posted by
  Lisa |
  Post a Comment | |
  Email Article |
  Print Article
 My name is Lisa and I'm a crafty girl with wanderlust working as an engineer by day. My blog chronicles projects in my home as well as pictures and stories from my travels.
Nassau, Bahamas
1.2011
 Monday, February 4, 2013 at 7:22AM | Posted by
  Lisa |
  Post a Comment |
  Share Article |
  Email Article |
  Print Article
 Cataratas del Iguazú, Argentina
5.31.2007
 Sunday, February 3, 2013 at 1:03PM | Posted by
  Lisa |
  4 Comments |
  Share Article |
  Email Article |
  Print Article
 Vienna, Austria
5.2006
 Friday, February 1, 2013 at 7:52AM | Posted by
  Lisa |
  Post a Comment |
  Share Article |
  Email Article |
  Print Article
 In the U.S. taking out the garbage is easy. I have a bin for recycling and for regular garbage and on the assigned day of the week for my street, Monday, I pull the bins out to the curb for pick up. When I get home from work the bins are empty and I roll them back into my garage. With only one day a week with only two bins to deal with it is super simple.
When I was living in Japan it was a different story for me. In the U.S. in most areas we don't have to separate our recycling but in Japan you do. To an outsider it can be a little confusing with all the different categories and rules for sorting and disposal.
Among the expat community garbage stories abounded. There was the person who wasn't sure how to dispose of Pringles cans so he saved them in a bag and left them in the hotel room he stayed at the night before moving back to his home country. There was the person who accidentally put a fruit peel in the wrong bin at work and came back from a meeting to find that a Japanese co-worker had put it back on his desk. And of course there were several stories of people decided to ship something back home to throw away there rather than figure out how to get rid of the item in Japan.
Personally, I had a co-worker explain to me that I was throwing out my soda bottles in the wrong manner at work. First, you rinse the bottle. Then you remove the cap and label with each going in a separate bin. Finally you put the bottle in a crusher apparatus you stomp on with your foot and then place the bottle in the plastic bin. This all may seem ridiculous but until you have lived it, it is a little hard to understand how it can be that complicated.
Needless to say, when I first moved to Japan I was a bit preoccupied with my garbage. I didn't want to be the clueless foreigner who was doing it wrong not to mention that if you make a mistake they simply won't take your bag.
First you have to have the proper bags. Each town has local bags that are marked with the town name and what type of garbage should go inside. They are clear so that the contents can easily be seen and the labeling is color coded. Where I lived in Toyota City plastic went in a black bag, burnable went in a green bag and metal went in a blue bag for example. My friends who lived in Nagoya had completely different bags with different colors.
Next you have to make sure that you are putting the correct thing in the correct bag. For recylable things like paper and plastic there is a little icon printed on the item to let you know, however it was not as easy as it seems. There were a lot of unwritten rules that weren't obvious like clean paper should get recycled but if the paper was dirty it should go in the burnable bag.
With the garbage sorted you have to make sure that you put the right items out at the right time. Burnable garbage was picked up every week on Tuesday and Friday, plastic every week on Monday, metal once a month on the second Wednesday and landfill once a month on thee fourth Wednesday. For the items picked up weekly it wasn't such a big deal but trying to remember to take the monthly items out on the right day was tough. I had one bag of metal items that I missed getting out two months in a row accidently. Below is the sign posted in my local garbage pick up area indicating the dates of pickups and a few example items that go in a particular type of bag. This wasn't terribly helpful to me since I didn't need to know how to throw out plastic robots or cinder blocks. I needed more practical advice on how to throw out a milk carton. I later determined that milk cartons needed to be flattened in a specific way and turned it at a bin at the grocery store. Obviously!
Lucky for me, my drop off point for my garbage was just outside my apartment building. It was a small concrete and tiled area with a net over it to keep birds out. When I first moved to Japan I would take a look at what types of items people were putting in which types of bags so I could make sure I was getting it right.
For items that are not picked up at the drop off spots you need to take them to recycling centers. At the end of my time in Japan the larger items that would have required bulky disposal (which you have to pay for) I was able to sell or give to other expats or to sell back to a recycle shop so I didn't need to worry about it.
I took a look at the Toyota City website while writing this and found they now have a detailed list of how various items should be thrown away. They even have versions in other languages included English. I sure wish I had that while I was living there! All of my garbage questions would have been easily answered in this fourteen page document.
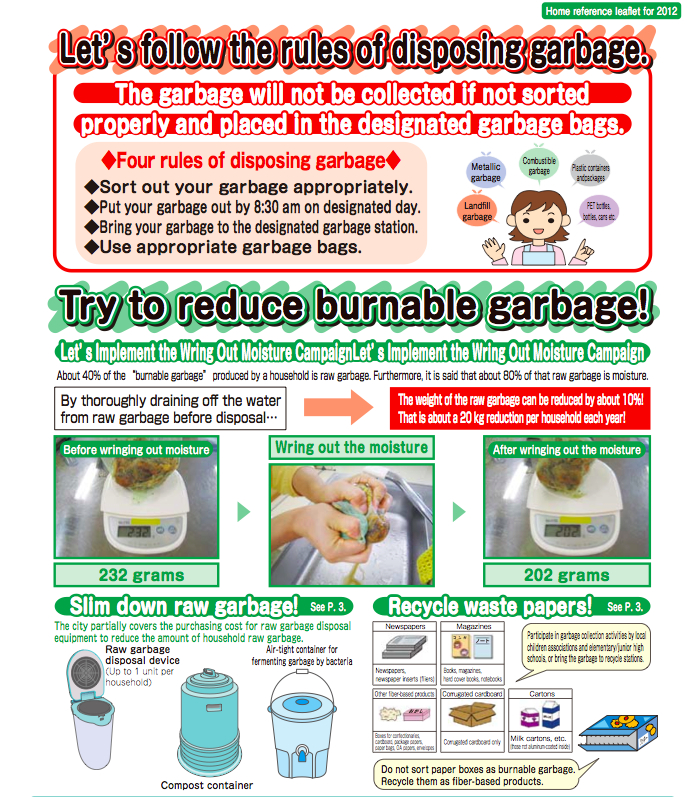
The first page has a landmine of information. If I had this when I was in Japan I would have known the process for throwing away my soda bottles without having my colleague needing to tell me I was doing it wrong. Also, please note the recycling mascot character in the top right. It's name is Risa which I am guessing is short for the word recycle in Japanese (pronounced risakuru). Risa also happens to be how my name is pronounced in Japanese. Coincidence, I think not...

On this page I learned that I had been completely clueless to the fact that I was supposed to be wringing out my garbage before throwing it away. On my next trip to Japan I will implement.

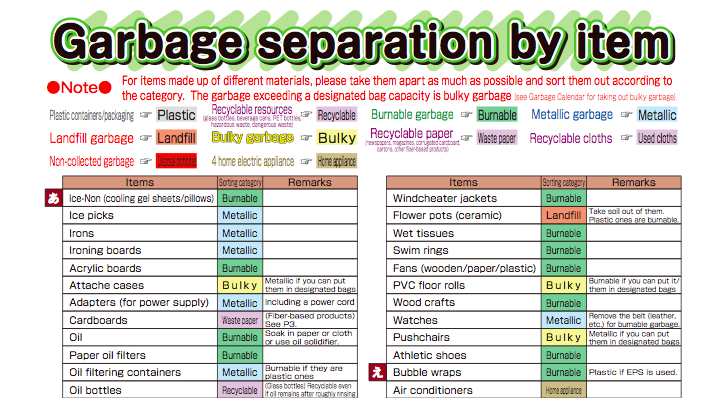
They are even eight pages dedicated to listing up various items and telling you which of the disposal methods you should use. The list is in order of how you would find the Japanese equivalent word in the dictionary so finding the right item is a bit tough in the English document, but this is still an awesome resource. I always wondered how you would dispose of swim rings and now I know that they are totally burnable garbage.

I've just shared a few snipets of this Japan garbage disposal instruction treasure, but if you want to check the whole document in it's glory here it is: Toyota Region Garbage Home Reference Leaflet for 2012. Looking back it makes me happy that now all I need to do this week in the U.S. is roll two bins to the curb for my garbage pick-up. I will never take my garbage pick-up for granted again!
 Thursday, January 31, 2013 at 9:05AM | Posted by
  Lisa |
  11 Comments |
  Share Article |
  Email Article |
  Print Article
Luang Prabang, Laos
8.16.2011
 Thursday, January 31, 2013 at 8:59AM | Posted by
  Lisa |
  1 Comment |
  Share Article |
  Email Article |
  Print Article
 Sydney, Australia
11.2010
 Wednesday, January 30, 2013 at 8:46AM | Posted by
  Lisa |
  2 Comments |
  Share Article |
  Email Article |
  Print Article
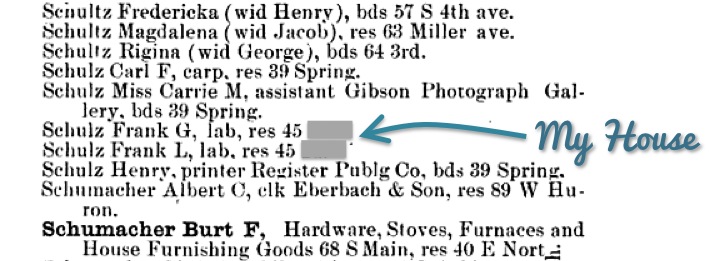
 My house is old. I'm not exactly sure how old, however. On property records the city of Ann Arbor lists any house that was existing at the turn of the twentieth century as being built in 1901 so that doesn't give much clue. I did find that my house is listed in an 1892 City Directory as being owned by two laborers named Frank G. and Frank L. Schulz with a slightly different address (an additional digit was added onto the front of the addresses on my street at some point in time). It is unclear exactly when it was built but at the very least my house has 121 years of history behind it.

As an aside I am completely fascinated by how much information was displayed in that 1892 directory. You can see by the excerpt above not only is your address listed but your profession, whether you are a resident or boarder at your home, your husband's name if you are a widow and your business address if you owned a business. It is such a neat snippet of life!
Back to my house, whenever I talk about it being old in conversation I will typically say something along the lines of, "My house is so old it is built on logs." People usually think I am saying this just for effect and honestly I am a little bit because it sounds pretty cool. That doesn't take away from the fact that it is completely true. By logs, I really mean logs, as in they still have the bark on them. I remember the first time I went into the basement, looking up and and being amazed and surprised to see the log joists.
Nowadays many of the logs are obscured by the ductwork and wires running below them, but I thought I would share a few pictures. They are pretty terrible since I have about zero natural light in the basement, but I still think it is neat. Here is one of the joists holding up my living room next to one of the ducts.
Check out this cool mortise and tenon joint. (Please disregard the old non-functional wiring that I haven't gotten around to ripping out)
In the "new" section of my house there are some huge hand hewn beams. This beam is holding up the side wing that used to be a grocery store. Clocking in at about 12" x 12" it is a monster. You don't see that kind of lumber in modern construction.
My favorite part is seeing the tool marks on the wood. It really makes me think about how old my house is and what it must have been like to originally build it. I do have to say, it also makes me feel very lucky to have power tools.
I know it may sound a little strange to love the joists in your basement, but I really do. They are such a great reminder to me about why I bought an old house, even though the headaches of remodeling can be frustrating.
Do you have any quirky features about your house that you love?
 Tuesday, January 29, 2013 at 8:35AM | Posted by
  Lisa |
  16 Comments |
  Share Article |
  Email Article |
  Print Article
 Mount Ruapehu, Tongariro National Park
North Island, New Zealand
9.08.2005
 Tuesday, January 29, 2013 at 8:29AM | Posted by
  Lisa |
  Post a Comment |
  Share Article |
  Email Article |
  Print Article
 This weekend I finally had a chance to get working on my Project Life album. Instead of doing a spread for every week I am doing a spread every time I have enough pictures to fill up the pockets. This particular layout covers January 2-9. Living alone and not having kids, I am afraid that my daily life spreads (i.e. when I am not traveling) are mostly going to be about food and this layout is no exception.
I purchased the Seafoam Core Kit of Project Life insert cards and while I love the color scheme, it didn't quite go with my photos for this spread. I think what I am going to do to give my album a cohesive look is to use the black, white and grey from the Seafoam Kit and then add in one other accent color for each spread based on my photos. For this particular spread, red seemed an obvious choice to add in.
Starting from the top left corner, I took a photo from a restaurant Frank and I visited and added the name with some foam letter stickers with a band of grey cardstock.
In the top right corner I used a grid 4x6 card for the background and added a title with washi tape and rub-on letters. Since the rub-on letters are not repositionable, I tore off long pieces of the red washi tape and placed them on a piece of waxed paper. Waxed paper works great as a temporary surface because the washi tape will easily peel right off. I added the words to the washi tape with the rub-ons and then was able to adjust the title exactly how I wanted on the card before trimming the excess tape.
Working across the middle row from the left, I made a title block with some letters sticker, metal letters and some black and white washi tape. Next, I wrote some journaling about a favorite place to go on Saturday nights followed by some masala chai teat that I made and my attempts to get my craft room organized.
In the bottom left corner I divided a grid card into quadrants with lines of black cardstock and used red foam stickers to add a title. The little grey icon is from one of the 3x4 Seafoam Kit cards that I cut out to use as an accent.
The bottom right corner has a simple strip of journaling with grey cardstock and a slice of one of the grid cards. The little red dots are periods from the red foam letter stickers I used on the previous pocket card.
On the right page of the layout, I made an enlargement of one of the photos that I took at the Michigan vs. Nebraska basketball game. We got the tickets last minute and they were pretty far away so the picture isn't the greatest but I still like it.
I downloaded pictures of the Michigan and Nebraska logos and made a design with them and the score in Power Point. I then printed it out on one of the grid cards. Along the bottom I added some grey patterned paper and a strip of black cardstock to make a journaling space under the title block.
This is only my second Project Life spread but I am having fun so far. Hopefully I can keep up for the year!
Supply List
Project Life Core Kit - Seafoam Edition
Project Life 4" x 6" Grid Cards
Project Life 3" x 4" Grid Cards
Project Life Photo Pocket Pages - Design A
Project Life 12" x 12" Page Protectors
Large red letter stickers: Unknown
Small red and grey letter stickers: lily bee design, Picket Fence Collection ABC Stickers
Red foam letter stickers: American Crafts
White foam letter stickers: American Crafts
White rub-on letters: Making Memories
Red washi tape: Target
Black and white washi tape: Love My Tapes, White Diagonal Line On Black Washi Tape
Saturday cardstock sticker: Little Yellow Bicycle
Black cardstock: Bazzill
Have you been doing any scrapbooking lately? What have you been working on?
 Monday, January 28, 2013 at 7:11AM | Posted by
  Lisa |
  9 Comments |
  Share Article |
  Email Article |
  Print Article
Lake Towada (十和田湖)
Aomori Prefecture, Japan
3.28.2009
 Monday, January 28, 2013 at 7:05AM | Posted by
  Lisa |
  2 Comments |
  Share Article |
  Email Article |
  Print Article