Welcome

My name is Lisa and I'm a crafty girl with wanderlust working as an engineer by day. My blog chronicles projects in my home as well as pictures and stories from my travels.

Search


Instagram

Blog Index
The journal that this archive was targeting has been deleted. Please update your configuration.
Navigation
Monday
Jun182012

Scrabble Tile Wall Art


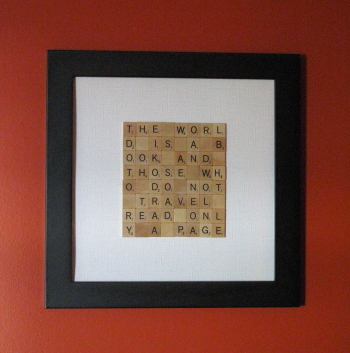
I love playing Scrabble so I've been meaning to make some kind of wall art for a while with Scrabble tiles. After thinking about it for a bit I decided I wanted to write out a quote with the tiles and instantly the following quote by St. Augustine came to mind, "The world is a book and those who do not travel read only a page." To me it is perfect for the project for so many reasons. I love to travel so the quote resonates with me plus the reference to books reflects my love of reading and ties back to the word game of Scrabble.

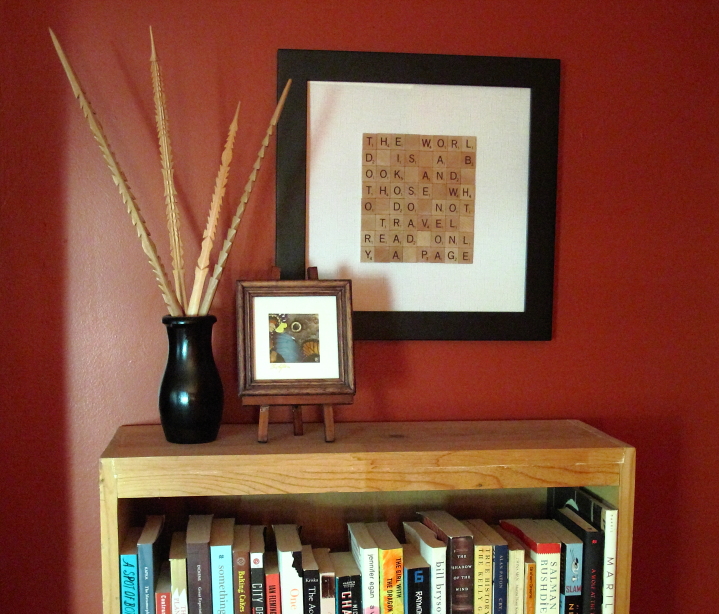
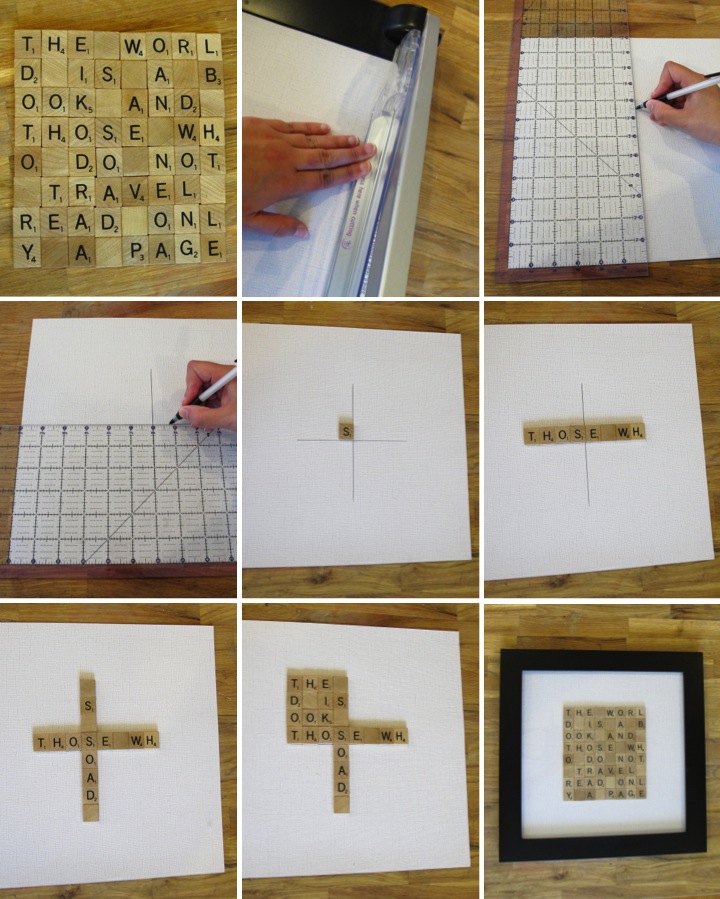
With my idea set I bought some wooden Scrabble tiles on eBay and then laid out my quote design into an 8 tile by 8 tile square. I didn't have enough blanks so I just flipped over some letters that I was unlikely to use later (like Z and Q) for my extra spaces.

I also bought a piece of white textured scrapbook paper and a 12" x 12" picture frame. The frame came with a double mat about the thickness of a Scrabble tile so I knew it would be able to fit my project. I trimmed my paper to fit in the frame  and then measured to the center of the paper, drawing a vertical line just a bit shorter than the height of my tile design. I repeated the same procedure in the horizontal direction. This gave me guidelines to be able to make everything straight and centered.

I started by using a tiny dab of hot glue to adhere the tile that went in the corner of the upper right quadrant, aligning it with my guidelines. Working from the center out I then attached the rest of the tiles in that line. Next, I placed the tiles along the vertical guideline, again working from the center out. To finish up I filled in each quadrant in the same manner.  After that I just popped the paper in my frame and it was ready to hang.

I decided to hang my Scrabble tile quote over a bookcase that I have in my upstairs hallway. I paired it with a carved wooden vase that I picked up in the little mountain village of Batad in the Phillipines. Inside the vase I put my Chuukese love sticks that I bought when I was visiting Micronesia to go scuba diving. I placed my framed butterfly wings from Costa Rica on a small easel to finish off my display. I think that my new Scrabble wall art and display arrangement definitely perks up this little nook of my home.

Monday
Jun182012

Picture of the Day: Statue of Triton Blowing A Conch

Trevi Fountain
Rome, Italy
3.25.2012 

Sunday
Jun172012

How to Wrap Gifts Like A Japanese Department Store

One of the things that I always thought was cool while living in Japan was the method that the department stores would use to wrap gifts. They wrap the gift with the paper on an angle, tucking the excess paper in as they go and the final result requires only a single piece of tape at the end. It always looks quite elegant and I would watch amazed as the department store clerks would beautifully wrap up something I bought so quickly and efficiently.

With one of my friends moving to Chicago I bought her a little book about the town as a going away gift and thought it would be fun to wrap in a Chicago map. I've been meaning to try to wrap something Japanese Department Store style and this seemed like a good opportunity.

I had seen it done a ton of times so I thought it wouldn't be hard but it is definitely a little more difficult than it looks. I tried it out with a scrap piece of paper before I wrapped it for real with the map and I am glad that I did. Getting the right angle and making sure the paper is big enough to cover your gift, but not so big that you have too much excess paper to tuck in is a little tricky. I think with a little practice it would be fairly simple to get the hang of though.

To wrap the gift place it in the bottom right corner of your paper at an angle so that you can fold a small amount of the corner of the paper over the bottom of the gift. Next, fold the paper over the right side of the gift, tucking in the excess paper at the corner so the paper lays flat.

Once you have the bottom and right side folded over, you flip the gift over itself on the table, tucking in excess paper on the right as you go. Now the gift is mostly covered with paper flaps still remaining on the left and top. Fold the left side over the gift, tucking in the excess paper and the finish by folding down the top over the gift. The wrapping paper can now be secured with a single piece of tape on the top flap. I finished my gift off by adding a handmade Bon Voyage card and some baker's twine with a bow.

I am happy at how my first try at Japanese Department Store gift wrapping came out and I'll have to try it again. If you are curious how the experts do it, here is a video of a lady slowly explaining how to wrap a gift (it's in Japanese but you can see how it is done) and here is a video of an Isetan Department Store Clerk in action wrapping a gift. Pretty neat, don't you think?

Sunday
Jun172012

Picture of the Day: Empire State Building at Night


New York, New York
12.21.2011 

Saturday
Jun162012

Treasures From My Travels: Sea Glass Souvenir Display

When I posted about the souvenirs that I bought during my recent trip to Panama I forgot to mention a free souvenir that I literally picked up. On the day that Missy and I spent on Isla Taboga, an island off the coast near Panama City, we lounged at the beach for a good part of the day and cooling off in the water in an attempt to escape the ninety degree heat.

There was a lot of sea glass washed up on shore so we decided to collect some, rinsing the sand off in the ocean. I gathered a handful of pieces but Missy lives in the Caribbean and is a sea glass finding expert so she found a bunch and shared with me. That is sisterly love!

Now that I am home I wanted to do something cool with my sea glass. I found a tall slender glass apothecary jar on sale and thought it would be perfect to use. To make my display I started by printing out a little tag with the location and date and cut it out. I then put a little tape on the top back edge of the label and adhered it to the inside of my glass jar. I used some craft sand and filled up the bottom of the jar until the label was secure but not so much that the tape was covered. I then gently peeled off the tape and added more sand until I reached the level that I wanted. You have to be careful to slowly add the sand so that grains don't sneak in front of the label. Pouring the sand in the jar left a dusty residue on the upper part of the jar so I wiped it clean and then finished my display by layering the sea glass on top of the sand.

I think it turned out cute and it pairs well with the Japanese glass fishing floats that I picked up at the Toji Flea Market in Kyoto in December.

Do you like to collect sea glass? Do you have a fun way to display it in your home?

Saturday
Jun162012

Picture of the Day: Doorway Carving Detail at Banteay Srei


Angkor, Cambodia
8.19.2011

Friday
Jun152012

Plans for My Back Entry

The back entry of my house when I bought it was a strange warren of lots of cabinets. The landing at the top of the stairs right as I would come in was especially strange, with a combination of angled corner cabinets topped by a cabinet that disappeared into a corner. Very strange!

Although all the random cabinetry didn't really make sense, it was relatively new and I had bigger fish to fry when I first bought the house, like making a useable kitchen and getting a functioning bathroom upstairs, so the back entry was pretty much left alone. The only thing I did was paint the walls green to match my kitchen (they were originally cream) to cover up the smoke smell in the room. The picture to the left was taken after I had painted.

Last year I started to tackle the area and ripped out the little section of cabinets on the landing and replaced the Pergo flooring with some grey slate linoleum tile. I originally thought about using real slate tile, but I live in the Midwest and with snow and rain this back entry with a few stairs has the potential to be wet a lot and I was afraid real tile would be too slippery.

Anyway, that is as far as I got before I lost momentum and stopped working on it. My long term plan is that I want to create a useable entryway with the little nook that now exists where the cabinets were. I want to build a bench with shoe storage and then have some hooks on the wall for coats and shelf for baskets of gloves and scarves.

Unfortunately, when I pulled out the cabinets I found unfinished dry wall so I have a long way to go. Here is what I want to do:

- Mud, tape, and sand the seams and screw holes on the unfinished drywall
- Prime and paint walls
- Replace the window trim
- Build shoe bench and install
- Back the wall with beadboard and add hooks
- Paint the bench, beadboard and shelves white 
- Build a storage shelf and install
- Add baseboards
- Sew a cushion for the bench
- Sew curtains for the window 

I'm thinking of painting the walls a pale avocado color that will be a bit lighter than my current color and still work well with my kitchen. This entry spot has some nice natural light with the window but as you turn the corner it gets a little dark and I want to lighten it up. I think that with the white bench and shelving and the grey flooring will make a nice combination.

What do you think? What are your must haves for a back entry to make it useful?

Friday
Jun152012

Picture of the Day: View of Lake Biwa From Atop Hikone Castle


Hikone, Japan
5.22.2011

Thursday
Jun142012

Treasures From My Travels: Panama Souvenirs

Yesterday I returned from a wonderful trip to Panama with my sister. We visited the canal, saw the old colonial city in Casco Viejo and went hiking in the rainforest. We spent a day in El Valle de Anton, a small town located in an extinct volcano crater, and a beach day on Isla Taboga, an island off of the coast near Panama City. During the whole trip we enjoyed some wonderful food and I especially enjoyed the ceviche and fried yucca.

While on my trip I also collected some new treasures to decorate my home. When Missy and I were visiting the Miraflores Locks at the Panama Canal we popped in the gift shop. Although most of the items were a bit too kitschy for our tastes we really liked the plate with an old map of the canal and we both ended up getting one.

Throughout our trip we saw tiny paintings on feathers for sale and I ended up buying three. I love all of the detail on the birds and frog. I'm not so keen on the colors of the mats but that can easily be swapped out when I frame them.

While Missy and I were in El Valle we went to the artisans market and had fun wandering around. One item that we saw a lot of were bateas, which are wooden trays used for tossing corn and rice. Some of them were finely sanded and lacquered but I really liked the unfinished ones that you could clearly tell were handcarved. They also happened to be much cheaper which was another bonus for me. There were some really huge ones I wish I could have taken home but I settled for a mid sized one (B/.5) and two small ones (B/.2 each).

Also at the market, Missy and I couldn't resist getting ourselves some Panama hats. We looked at different hats with different quality of weaving and tried a bunch on until we found ones that we liked. I think it will make a great beach hat.

As much as I love all the things I collected on my trip, my very favorite is a mola that I bought from a lady at a stand in Casco Viejo. Molas are part of traditional blouses of the Kuna women, with one panel being used for the front and another for the back. The have very beautiful reverse applique designs in bright, intricate patterns. The one that I bought has bird and flower designs in orange, red, teal and navy. I absolutely love the design and how skilled the tiny stitches are. At B/.42 ($42) it was by far my most expensive purchase but I thought it was worth it for the craftmanship and large size of the mola.

Now that I have had the fun of acquiring these treasures during my trip I get to have the fun of figuring out how to incorporate them into my home. I am thinking of framing the mola for my guest bedroom but other than that I have no plans yet. I'll have to see what I can come up with.

Thursday
Jun142012

Picture of the Day: Colorful Building in Flores

Flores, Guatemala
7.02.2010