


DIY Grow Light for Starting Seeds
 Every spring I mean to start some seeds indoors for my garden, but each spring comes and goes and I never seem to be able to find enough time to get around to it. This year, however, I decided was the time to finally make it happen.
I got some flats and soil for seed starting and picked out some fun packets of seeds to try but then I was stumped when it came to finding a grow light. I didn't see anything that I liked that was in the price range I was willing to pay so I ended up making the grow light myself. 
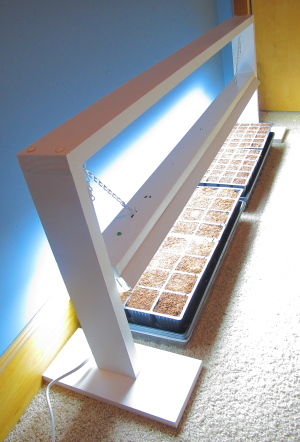
The concept I came up with is just a simple frame that holds up a fluorescent work light. I made the plans using 2x4s, but I actually ended up using some scrap wood that I had in my garage that wasn't quite as thick but was free. This is a pretty good project for using scraps and I actually only had to buy the light fixture, bulbs and wooden button plugs for a total cost of about $15.
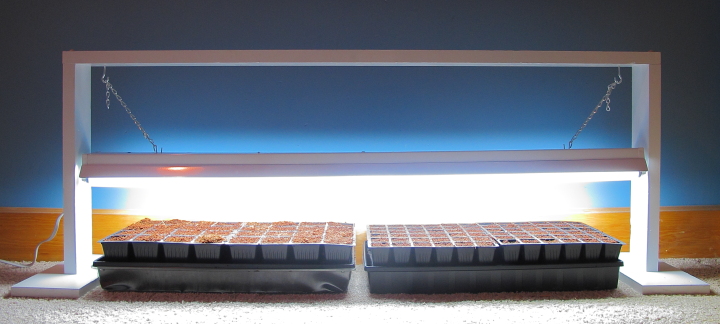
With the 48" light I can easily fit two flats under the grow lamp. By using button caps to hide my screw holes, I can easily disassemble the frame to store it after spring. The chains on the work light hang from J hooks so I can adjust the height of the light as my seedlings grow. Making the grow light took me less than an hour, not including time for paint drying and I am happy with how it turned out. Hopefully my seeds like it, too!
Supply List:
1 - 2x4 @ 8 feet long
1 - 1x6 @ scrap at least 2 feet long
1 - 48" fluorescent work light
2 - Daylight fluorescent bulbs
4 - 3/8" wooden button plugs
2" screws
Cut List:
1 - 2x4 @ 53" for top
2 - 2x4 @ 20" for side supports
2 - 1x6 @ 12" for base feet
Frame Assembly:
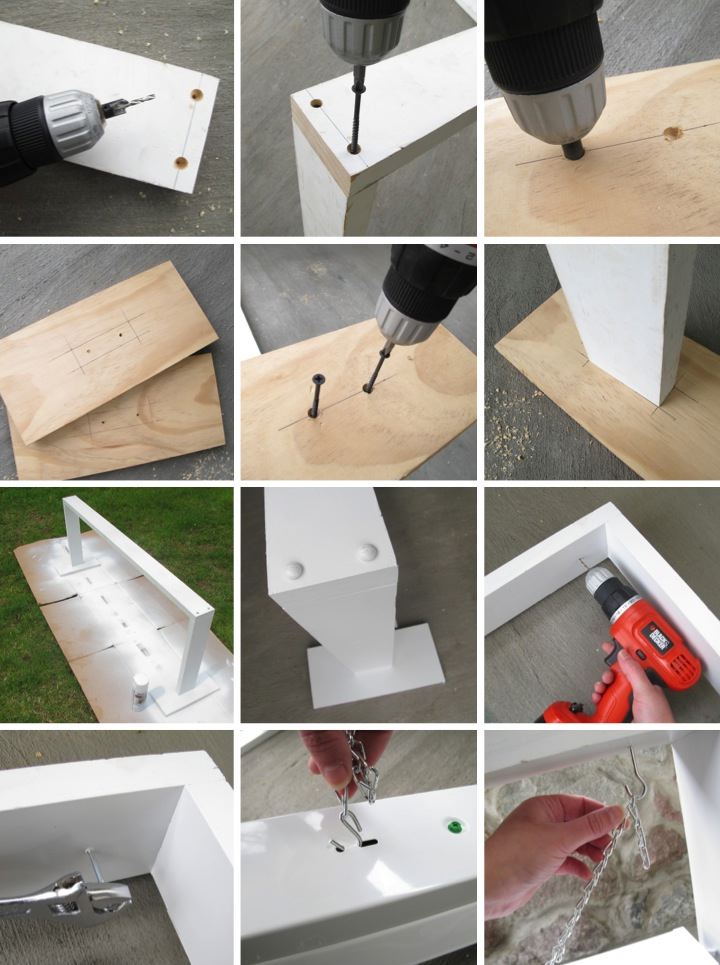
To start the frame I used a countersink bit to drill two holes on the top of each end of the top piece. I then used 2" screws to attach the top to the side supports.
Base Assembly:
On each base foot I marked out where to drill on one side and where the side support would be positioned on the other side. I used a countersink bit to then drill two holes in each base foot and started the 2" screws in the holes. I then lined up my markings with the side supports and attached the base feet by driving in the screws the rest of the way.
Finishing:
To finish the stand I primed it and then used three light coats of white spray paint. I did not fill in my screw holes at the top of the frame since I wanted to be able to take off the top piece for easy storage. Instead, to hide the holes I spray painted some wooden button plugs and pushed them into the holes. I can then remove the plugs when I need to access the screws for disassembly.
Lamp Assembly:
I drilled two small pilot holes in the bottom of the top piece of the frame for the J hooks at the distance indicated in the work lamp assembly instructions. It was 45" apart for the lamp I used, but if you are doing this check your instructions as they could vary. I started twisting in the J hooks into the holes by hand and then finished tightening them using a wrench.
Once the J hooks were attached I put the bulbs into the light fixture and slipped the chain hooks into the holes at the top of fixture. I finished hanging the light by slipping the chain onto the J hooks.
Once my grow light was done I was pretty eager to plant some seeds. I chose two different types of sunflowers, one that grows really tall and one that is a deep red color. I also planted zinnias in a variety of warm colors and a selection of lettuces. I can't wait for everything to sprout!
Have you started any seeds this year or in the past? Has it worked well for you? What did you plant?
 Lisa | 35 Comments | Share Article | Email Article | Print Article
Reader Comments (35)
Check out this week's complete ✳️ Dollar General Weekly Ad and next week's ✳️ Dollar General Ad! Go through the entire Dollar General weekly sales advertisement. Prepare your coupons for the upcoming weekly ad from Dollar General! The images are courtesy of Laney Saves.
Browse the Dollar General ad preview and find the best offers to save a lot of money! Don't pass up the fantastic deals in the weekly flyer from Dollar General!
It's quite simple to look through the Dollar General weekly sales advertisement. To make it simple to determine if the item you're looking for is on sale or not, Dollar General's sales are divided into categories.
Dollar General Ad
See this week's complete ✳️ Rouses Weekly Ad and the Rouses Ad the following week! To view every page of the Rouses weekly ad circular, use the left and right arrow keys. Prepare your coupons for the early Rouses weekly ad preview and plan your shopping trip in advance!
Make sure you are seeing all of the latest Rouses weekly deals by returning frequently.
Looking through the Rouses weekly flier is a breeze. To make it simple to determine if the product you're looking for is on sale or not, the Rouses sales this week are divided into categories. Regardless of the item you wish to purchase, be sure to review next week's.
Rouses Weekly ad Preview
See this week's complete ✳️ Food City Weekly Ad and the following week's Food City Ad! To view every page of the Food City weekly ad circular, use the left and right arrow keys. Prepare your coupons for the early Food City weekly ad preview and plan your shopping trip in advance!
Looking through the Food City weekly flyer is a breeze. The Food City sales this week are broken down into categories to make it simple to determine if the item you're looking for is on sale or not. Check out the Food City advertisement for next week, regardless of the goods you wish to purchase.
Food City Weekly Ad
Check out this week's complete ✳️ Publix Weekly Ad and next week's Publix Ad preview! Go through the Publix weekly ad circular from cover to cover.
Depending on your store, the new ad will run for one week starting on either Wednesday or Thursday. Make sure to check your store's schedule. Get your coupons ready for the early ✳️ Publix weekly ad preview, which includes certain Publix weekly ad bogo discounts, and plan your shopping trip in advance!
Perusing the Publix weekly flier is a breeze. This week's Publix sales are broken down into categories to make it simple to determine if the item you're looking for is on sale or not.
Publix Weekly Ad
Check out this week's whole ✳️ Meijer Weekly Ad and next week's ✳️ Meijer ad preview! Go through every page of the Meijer advertisement!
It's quite simple to look through the Meijer weekly flier. To make it simple to determine if the product you are looking for in this week's Meijer advertisement is on sale or not, the sales are divided into categories.
Looking through the Meijer weekly food ad and selecting the best offers can result in significant savings! Don't pass up the fantastic discounts in the next Meijer weekly advertisement!
Meijer Weekly Ad Preview
"Find the perfect wedding dress for girls for every occasion at Ministitch, where traditional elegance meets modern style. Explore our curated collection ...Read more
" wedding dress for girls
Buy birthday dress for boys and kids at the best prices from Ministitch. Our boys party wear dresses, and birthday dresses for boys are exclusive for kids. birthday dress for boys
Descubra nossa linha completa de chaves de impacto 40V. Atuação profissional, liberdade total de movimento e 12 meses de garantia.
Buy party wear gowns for girls online at the best prices from Ministitch. These gowns for girls online come in varied colors, patterns and sizes. gowns for girls